Help Center
-
Basic
-
Projects
-
Mission
-
Team
-
Files


User Manual
Just starting out with DooTask? No problem, this primer is for you!
-
What is DooTask?
DooTask is a lightweight open source online project task management tool that provides various document collaboration tools, online mind mapping, online flowcharting, project management, task distribution, instant IM, file management and other tools. It helps teams to advance their projects efficiently and makes work easier.
-
What is task management?
Task management is the process of monitoring your project's tasks through their various stages from start to finish. This involves actively making decisions for your tasks to accommodate changes that can occur real-time, with your end goal being the successful completion of your tasks. Project task management also means managing all aspects of a task like budget, time, scope, resources, recurrence and so on effectively.
-
How to manage tasks?
Here are some key steps involved in task management:
Prioritization: Whatever tool you use to manage your tasks, whether a simple to-do list or a comprehensive project task management tool, the most important aspect of task management is prioritization. This helps in efficiently completing all the tasks involved while maintaining the planned constraints.
Milestone tracking: The findings of this study also show that establishing clear goals is essential to the successful completion of a project. Although for task management an end goal isn't necessary, defining milestones helps motivate teams to execute tasks successfully.
Schedule management: Making sure your task gets completed on time is something that has an impact on the overall project health. Attributing the right time frame by estimating the effort involved is key here.
-
How to choose the right task management software?
Depending on your purpose, price range, existing work environment and preferred platform, there are several project and task management tools available. From simple checklists which may not even require an internet connection to a full-fledged project task management software, the capabilities are varied. There are also software options that fit specific industries like construction, IT or education or specific functions like crm task management.
-
Registered Account
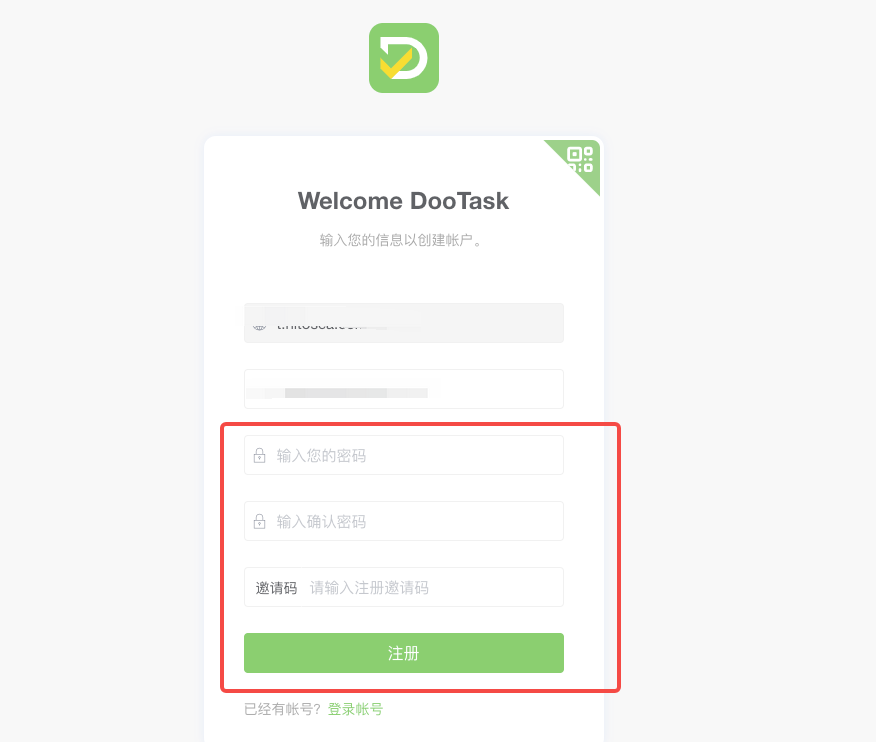
(1) Click [Register Account] to enter the registration page;
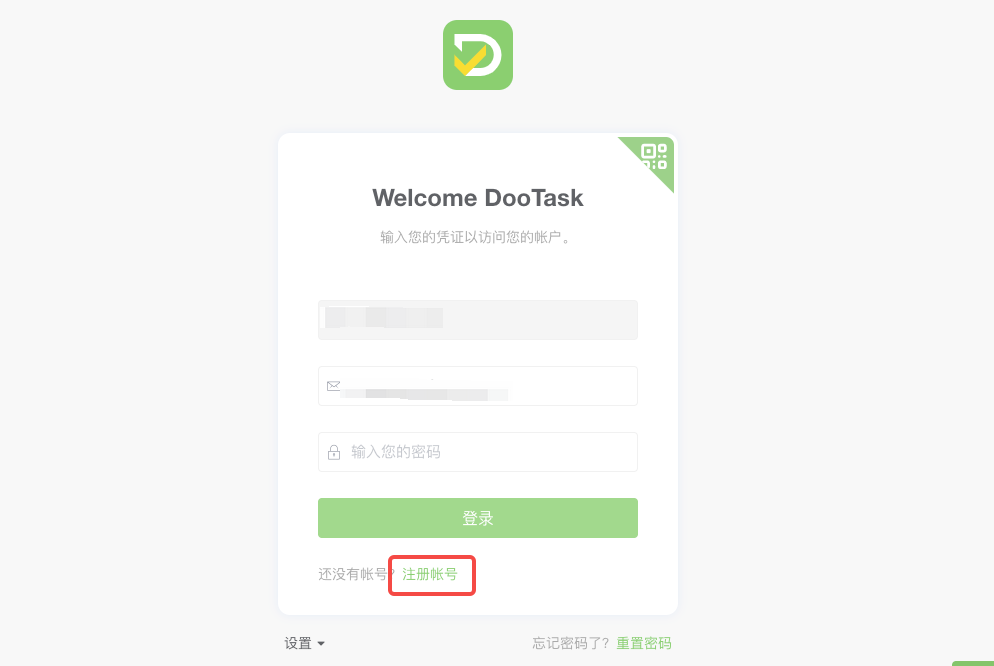
(2) In the corresponding input box on the registration page, enter your email address/password/invitation code respectively to create a DooTask account, and click [Register] to complete the account registration.
-
Login to your account
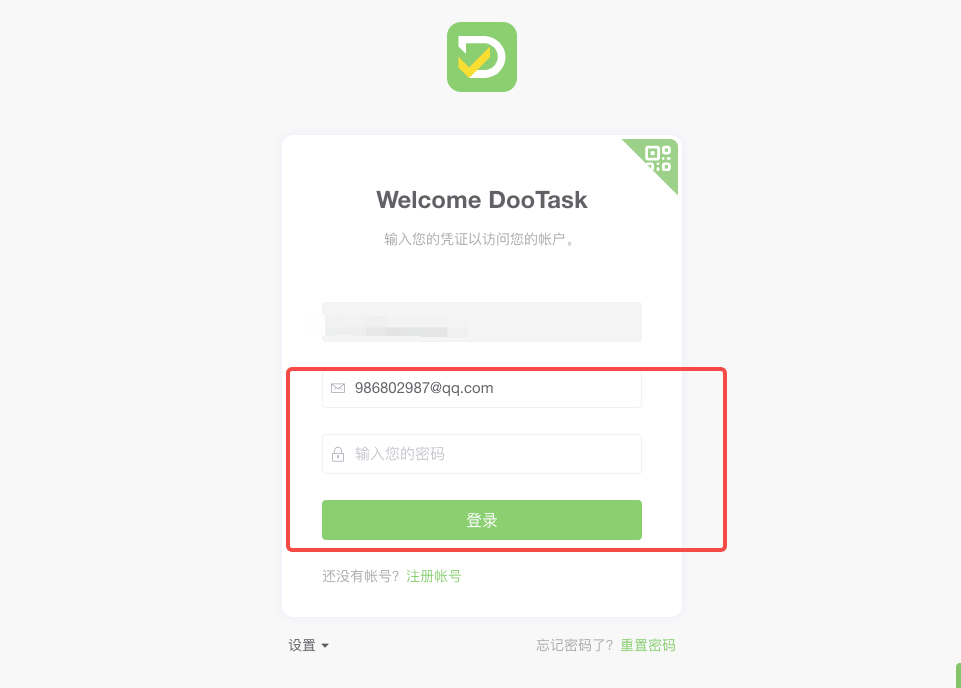
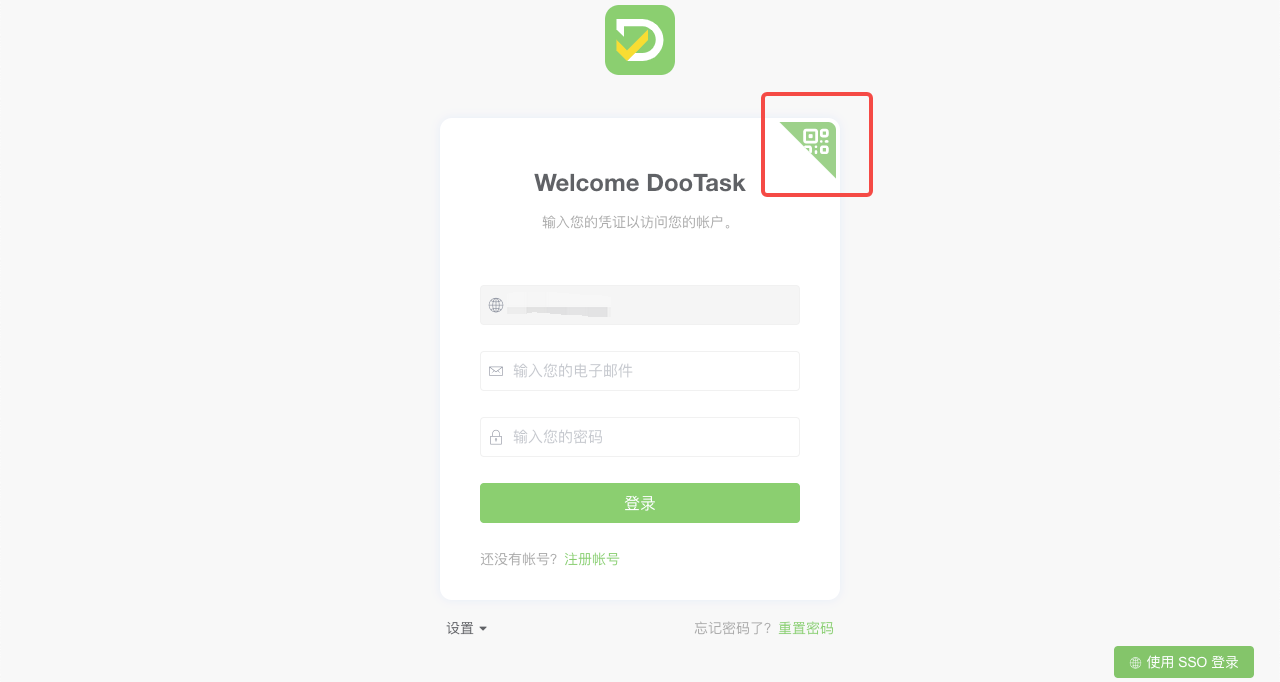
Account Password Login
(1) Enter your email address/password in the corresponding input box on the login page;
(2) Click [Login] to access your account.
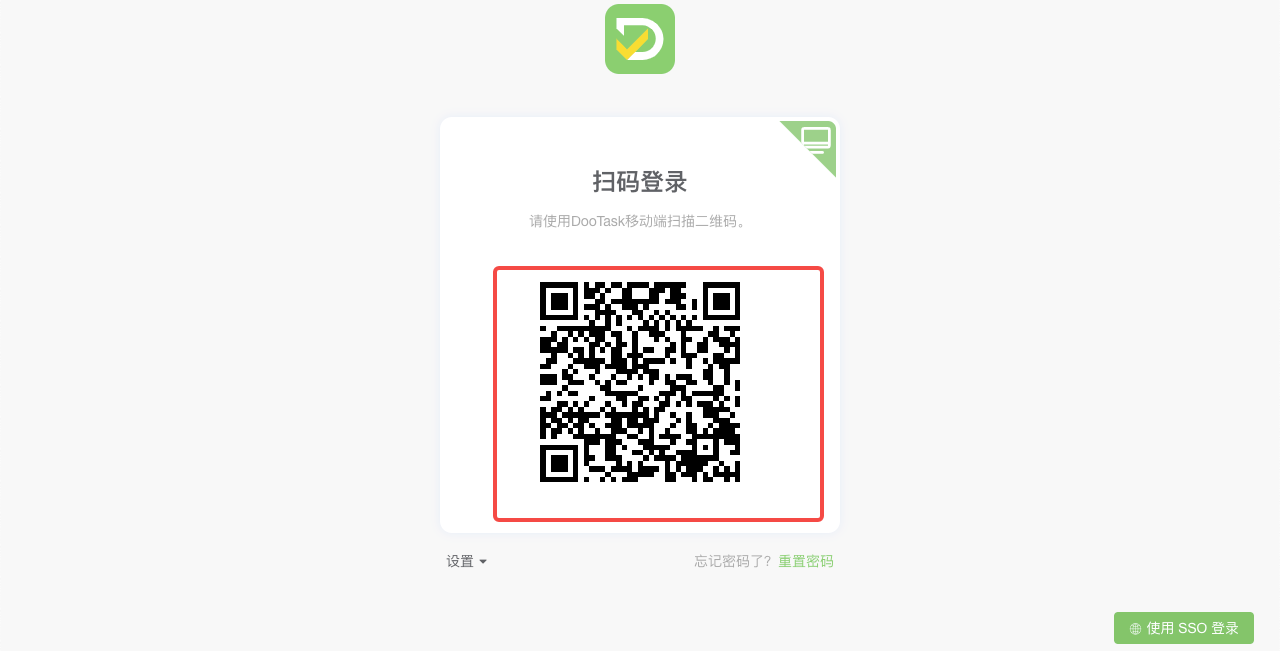
Scan Code To Login
(1) Click the green QR code at the top right corner of the login page to enter the code scanning login page;
(2) Use DooTask Mobile to scan the QR code to log in to your account.
-
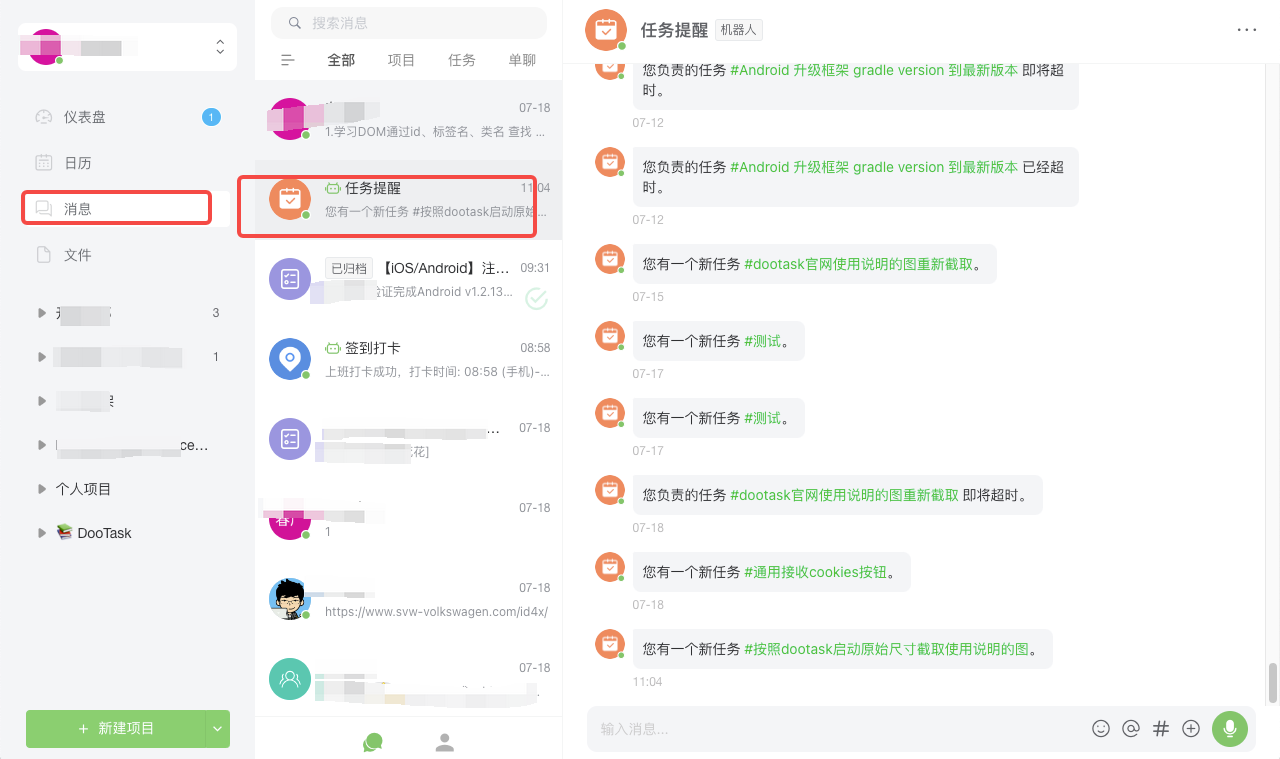
Task Reminder Robot
Open the [Message] button in the left navigation bar of DooTask, you can view the "Task Reminder", the task reminder robot according to the associated task change status real-time update reminder, such as the new task prompts, task modification prompts, task expiration prompts, and so on.
-
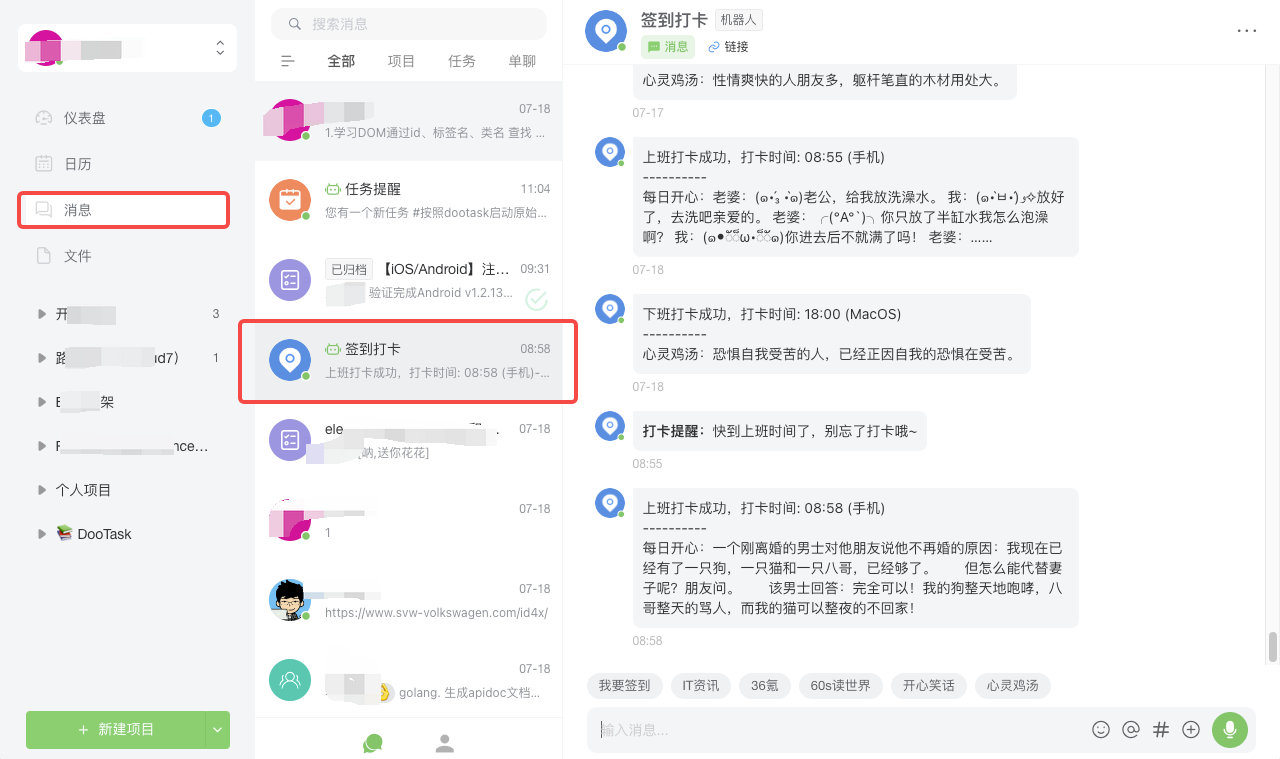
Check-in And Clock-out Robot
Open the [Message] button in the left navigation bar of DooTask, you can view the "Check-in and Punch-in", Check-in and Punch-in Robot automatically records the employee's daily check-in and punch-in data to help users achieve effective work progress management and time planning.
-
Personal Information Settings
(1) Click [Avatar] in the upper right corner of the user → click [Personal Settings] to select the personal settings page, you can modify your personal avatar/telephone/nickname/position (title) and other information;
(2) Click [Submit] to confirm the changes and [Reset] to clear the current settings.

-
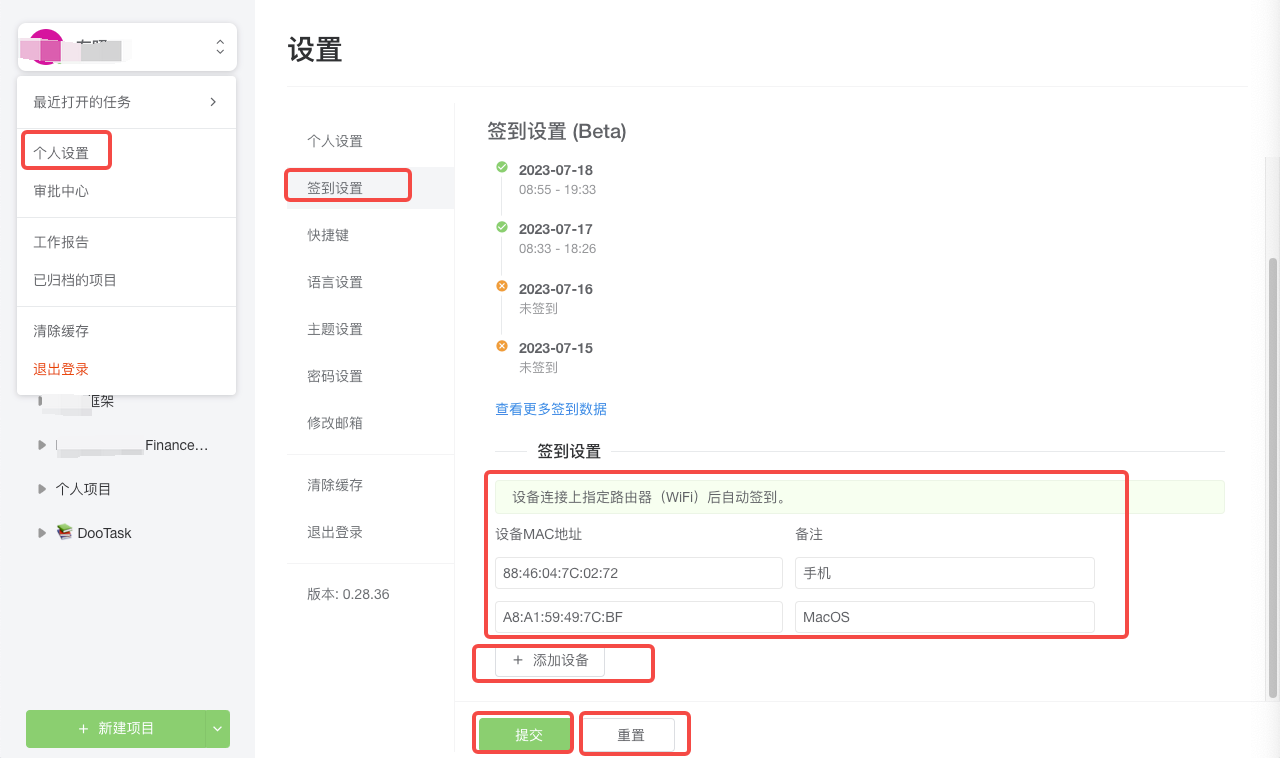
Check-in Settings
(1) Click the user's upper-right corner [avatar] → click [Personal Settings] → click [Sign-in Settings], that is, to display the last five days of the sign-in record, click the bottom of the [View more sign-in data] to view the history of the sign-in record;
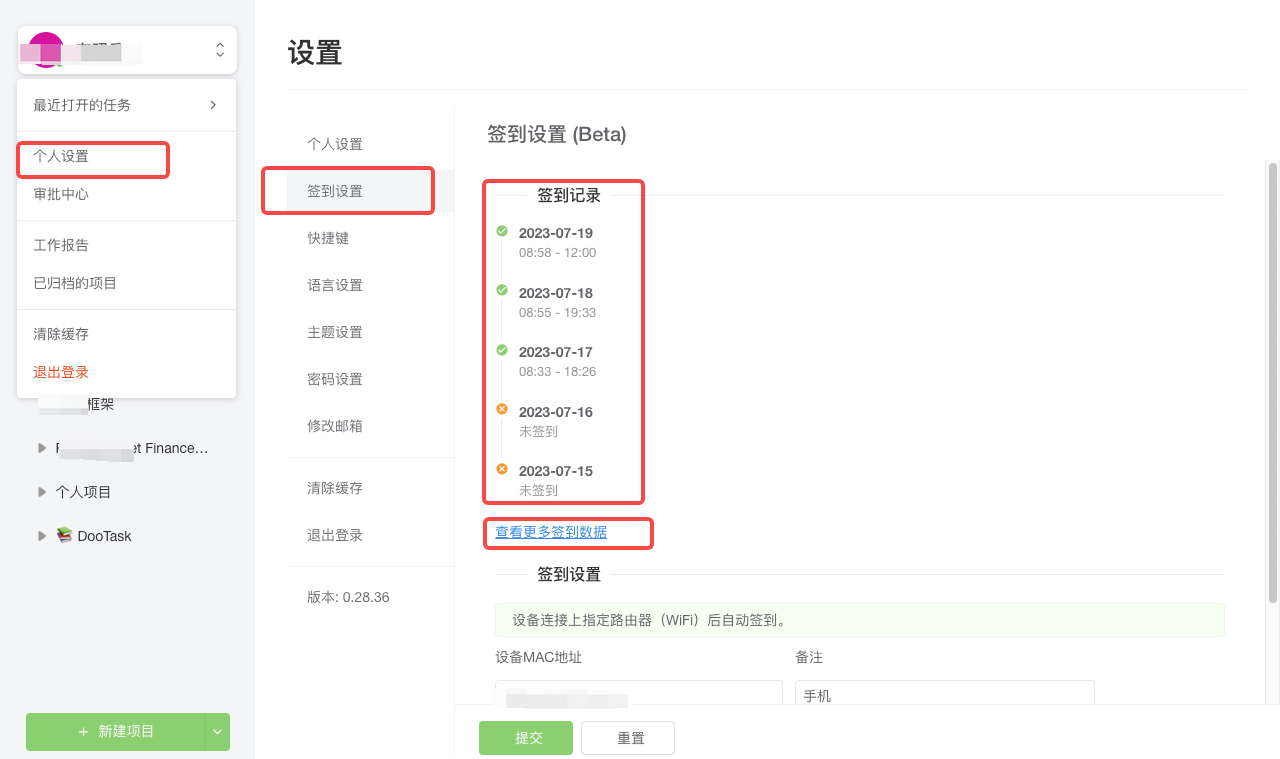
(2) In the corresponding input box under the check-in setting column, enter the device MAC address/remarks information, and associate the device to connect to the designated router (WiFi) to achieve automatic check-in, if you need to add other devices, you can click [Add Device] to add new ones;
(3) Click [Submit] to confirm the changes and [Reset] to clear the current settings.
-
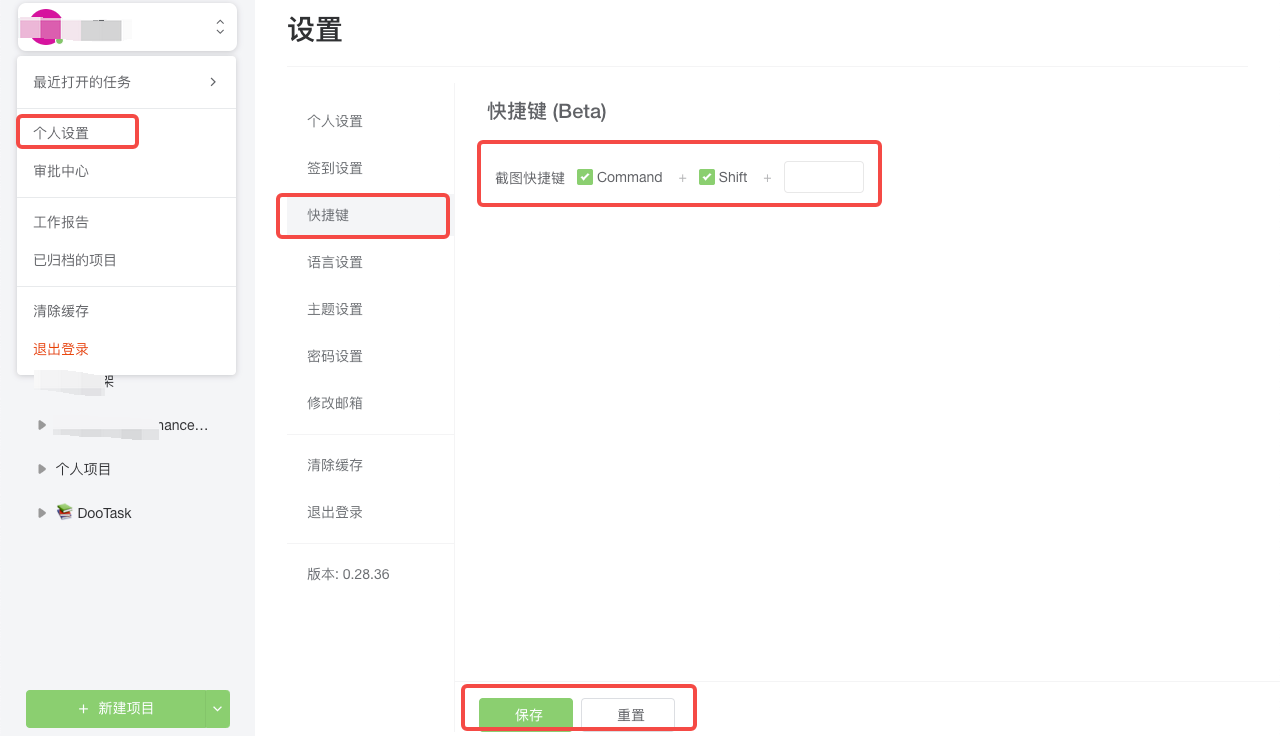
Shortcut Key Setting
(1) Click [Avatar] in the upper right corner of the user → click [Personal Settings] → click [Shortcut Keys], you can customise the shortcut key combinations according to your personal habits;
(2) Click [Save] to confirm the changes and [Reset] to clear the current settings.
-
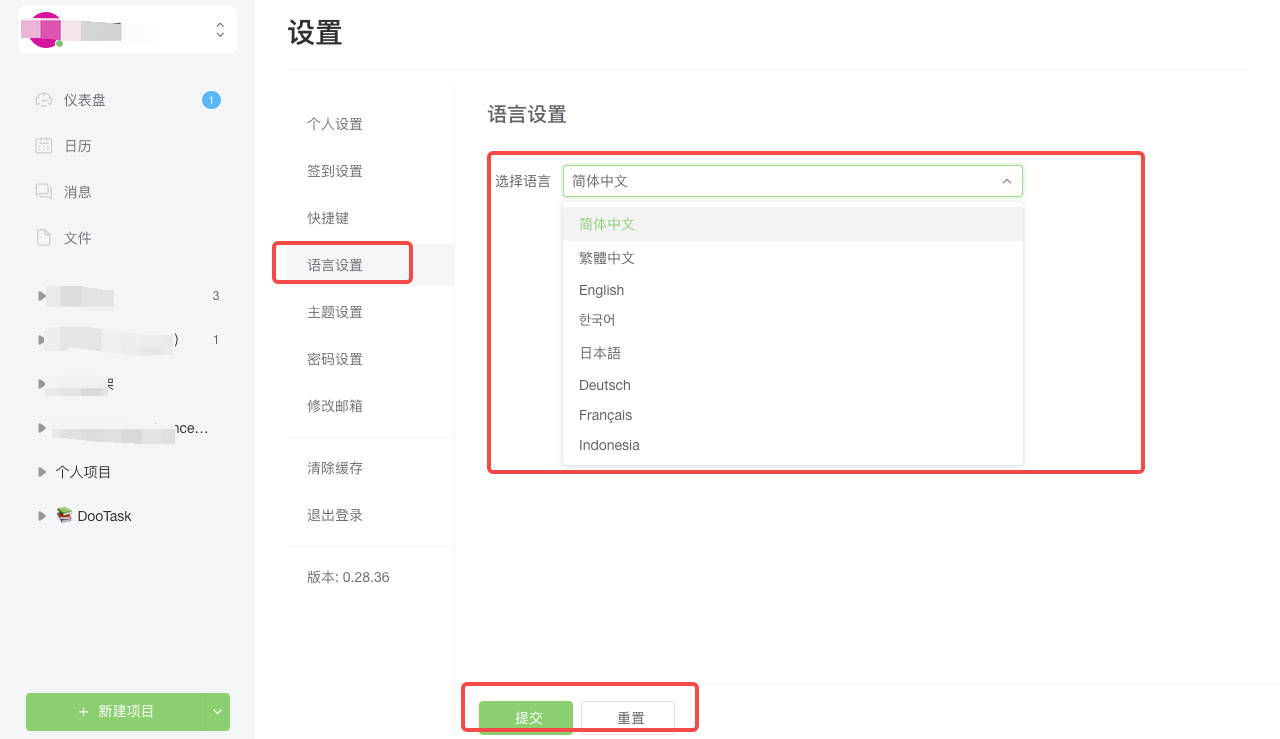
Language Settings
(1) Click [Avatar] in the upper right corner of the user → click [Personal Settings] → click [Language Settings], click the drop-down icon in the box to the right of the selected language to switch between different languages. The system currently supports Simplified Chinese, Traditional Chinese, English, Korean, Japanese, German, French and Indonesian;
(2) Click [Submit] to confirm the changes and [Reset] to clear the current settings.
-
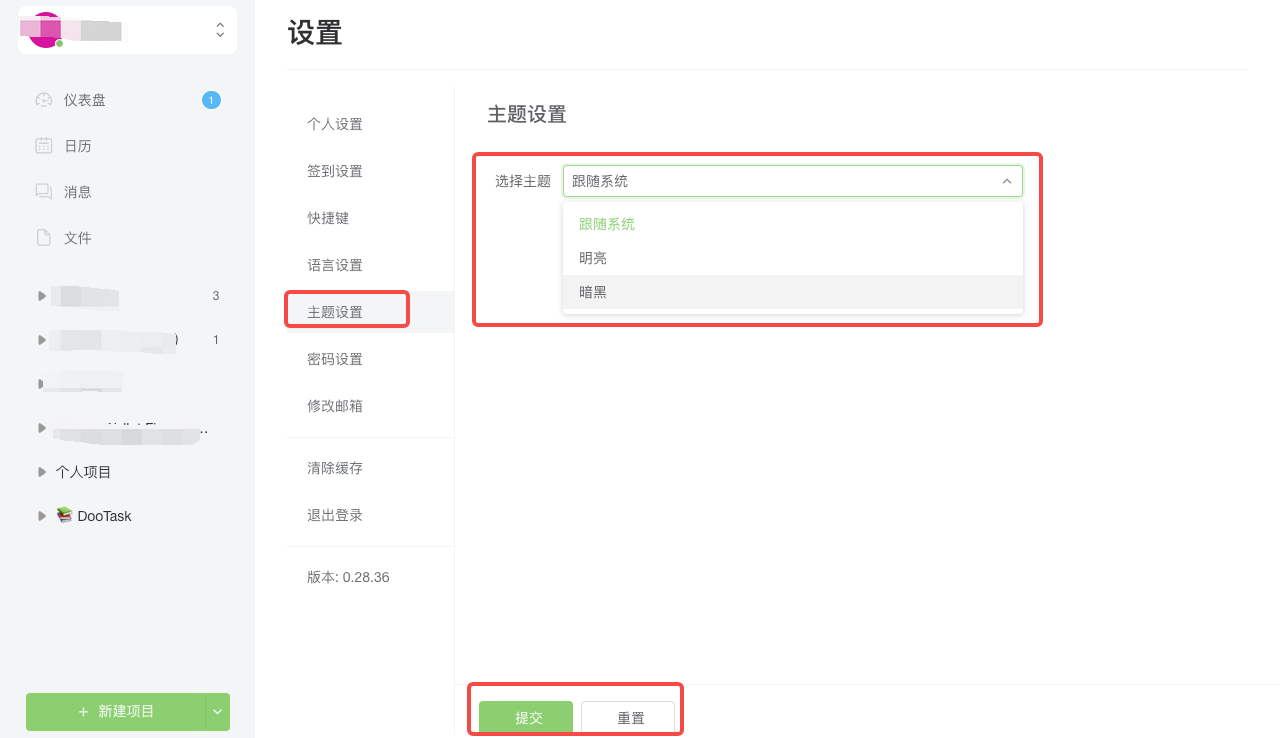
Theme Setting
(1) Click the user's upper-right corner [avatar] → click [Personal Settings] → click [Theme Settings], click to select the theme of the right side of the box drop-down icon, you can switch to the corresponding theme, the system currently supports the bright / dark two themes;
(2) Click [Submit] to confirm the changes and [Reset] to clear the current settings.
-
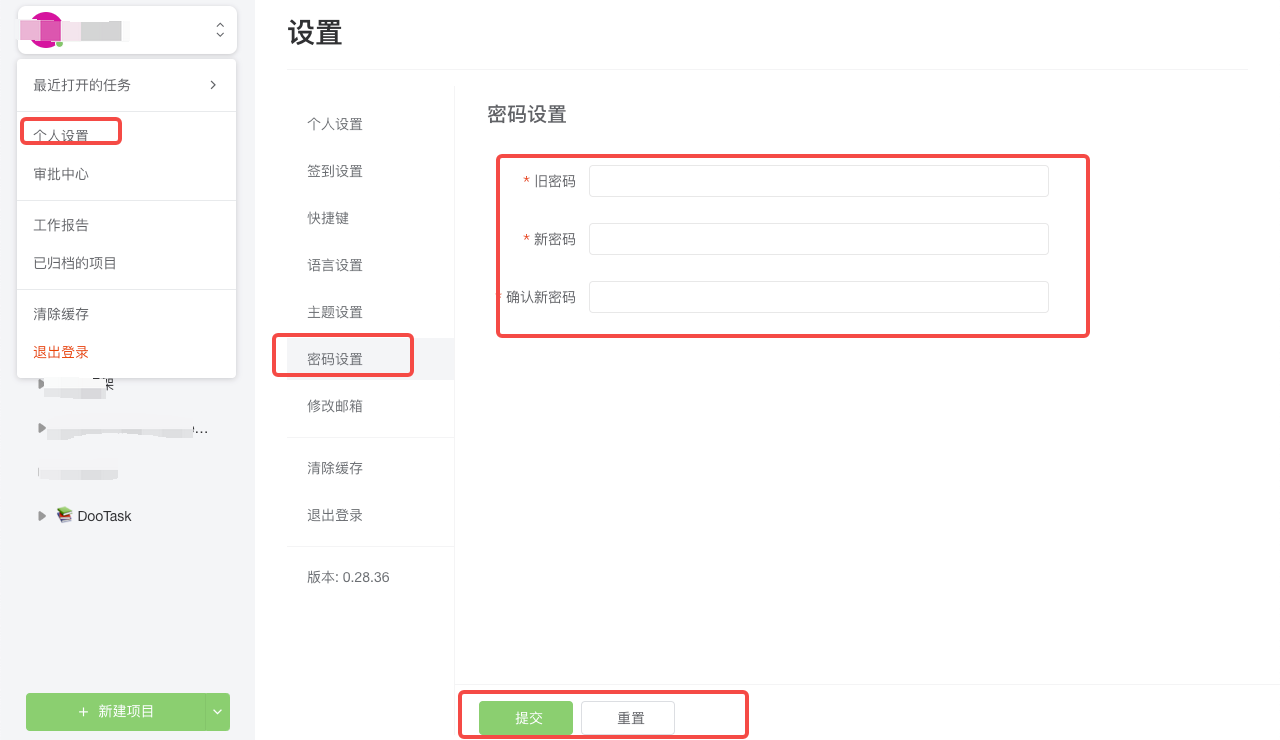
Password Setting
(1) Click [Avatar] in the upper right corner of the user → click [Personal Settings] → click [Password Settings], enter the user's old password → enter the user's new password → enter the user's new password again to confirm;
(2) Click [Submit] to confirm the changes and [Reset] to clear the current settings.
-
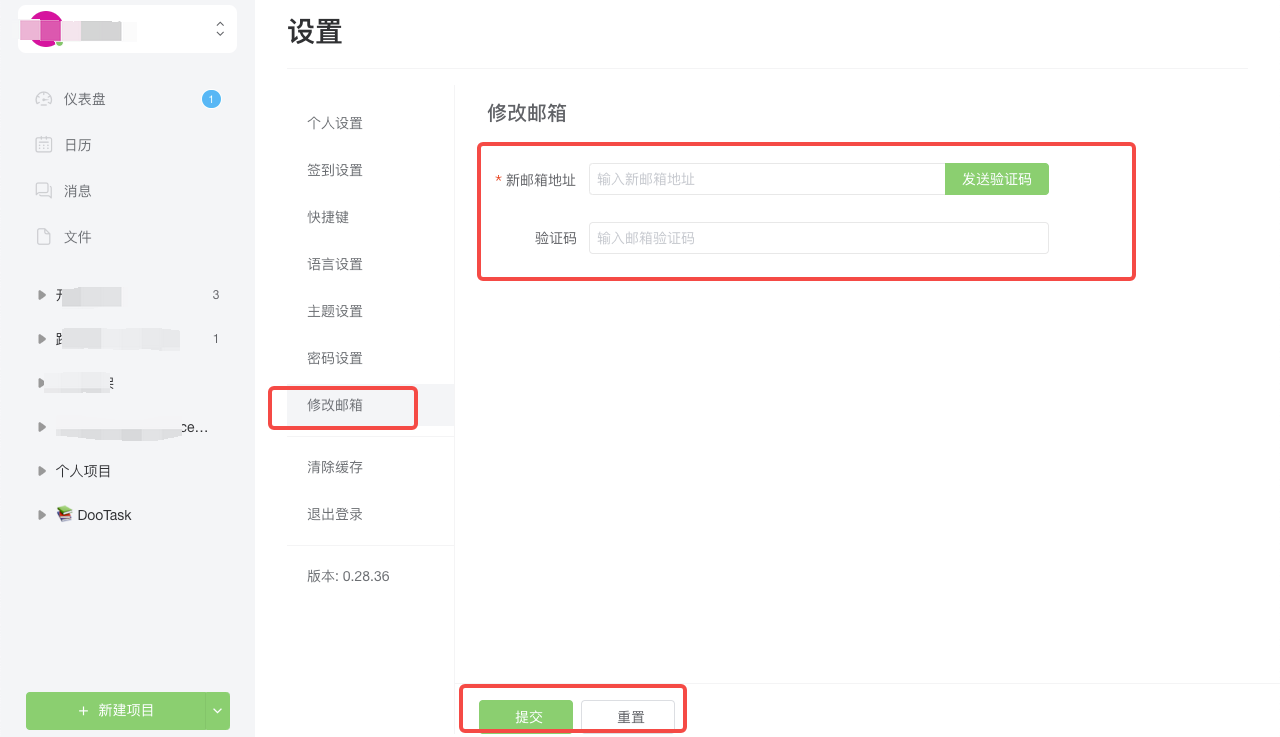
Modify Mailbox
(1) Click [Avatar] in the upper left corner of the user → click [Personal Settings] → click [Modify Mailbox], enter the new mailbox address and click [Send Verification Code] and enter the verification code;
(2) Click [Submit] to confirm the changes and [Reset] to clear the current settings.
-
Multi-style project management templates
DooTask template to meet a variety of team collaboration scenarios, while supporting custom templates to meet the team's personalised scenario management needs, you can intuitively view the progress of the project, team collaboration is more convenient.
-
Visualisation Project Office
Use multiple views such as Kanban, tables, and lists to keep the overall project at a glance; members have the flexibility to filter, sort, and group tasks to prioritise the essentials and stay focused.
-
Real-time monitoring of project management developments
Real-time changes in project dynamics, specific task changes record reminders, so that the team to control the overall project process, the development of appropriate plans.
-
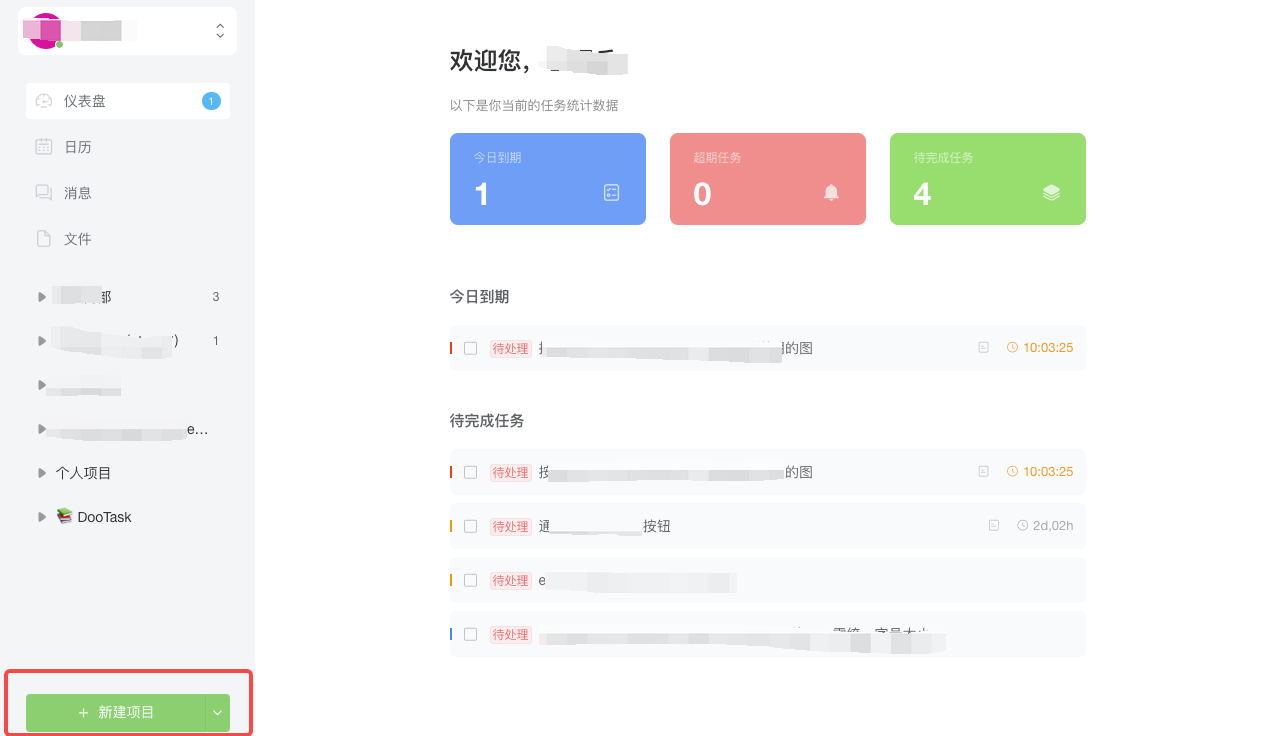
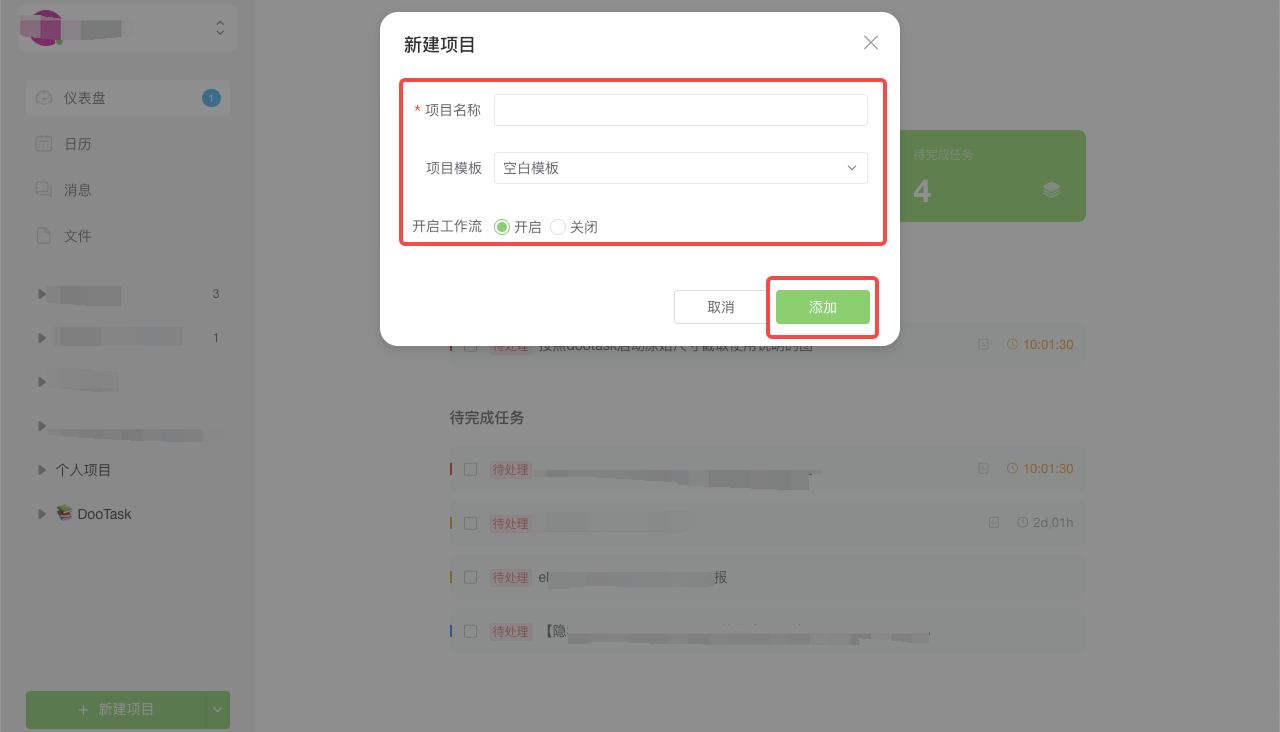
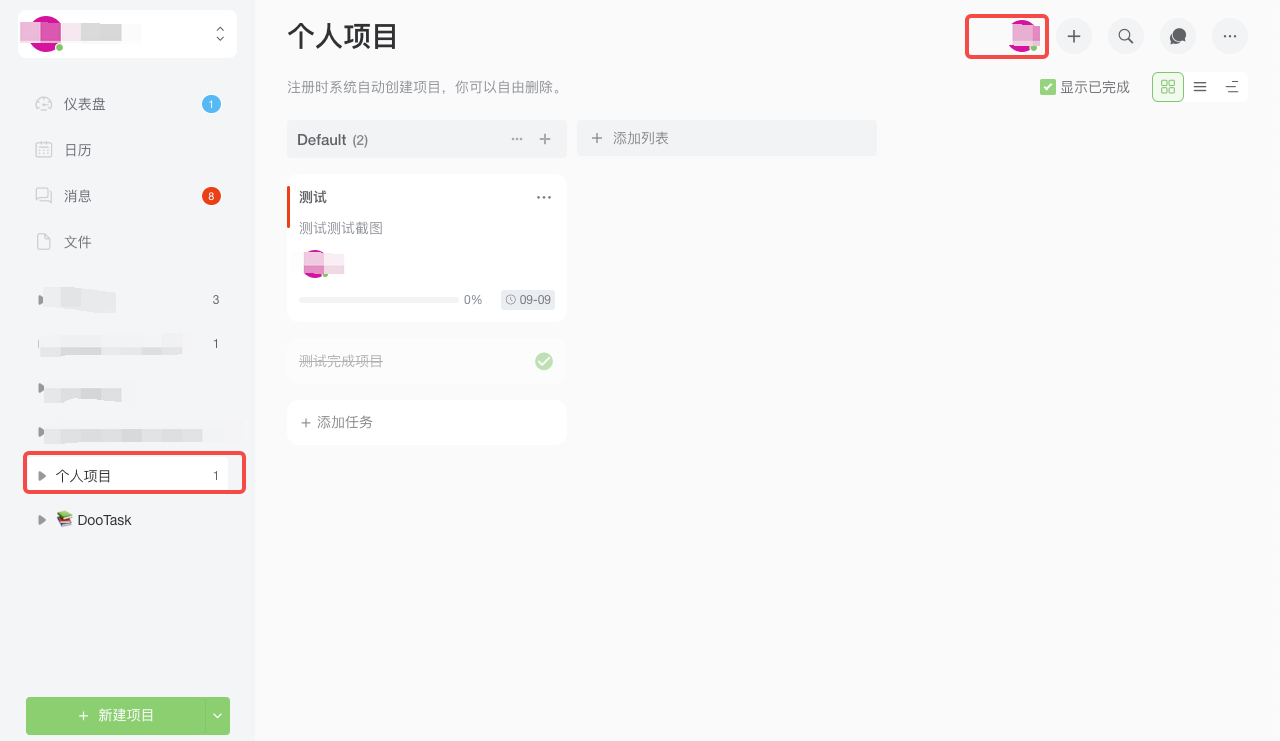
Create A Project
(1) Click [New Project] at the bottom left corner of the DooTask page;
(2) In the new project pop-up window that appears, enter the project name (required and can not be less than two words) ¡ú select the project template (default blank template) ¡ú select whether to open the workflow;
(3) Click [Add] to complete the project creation.
-
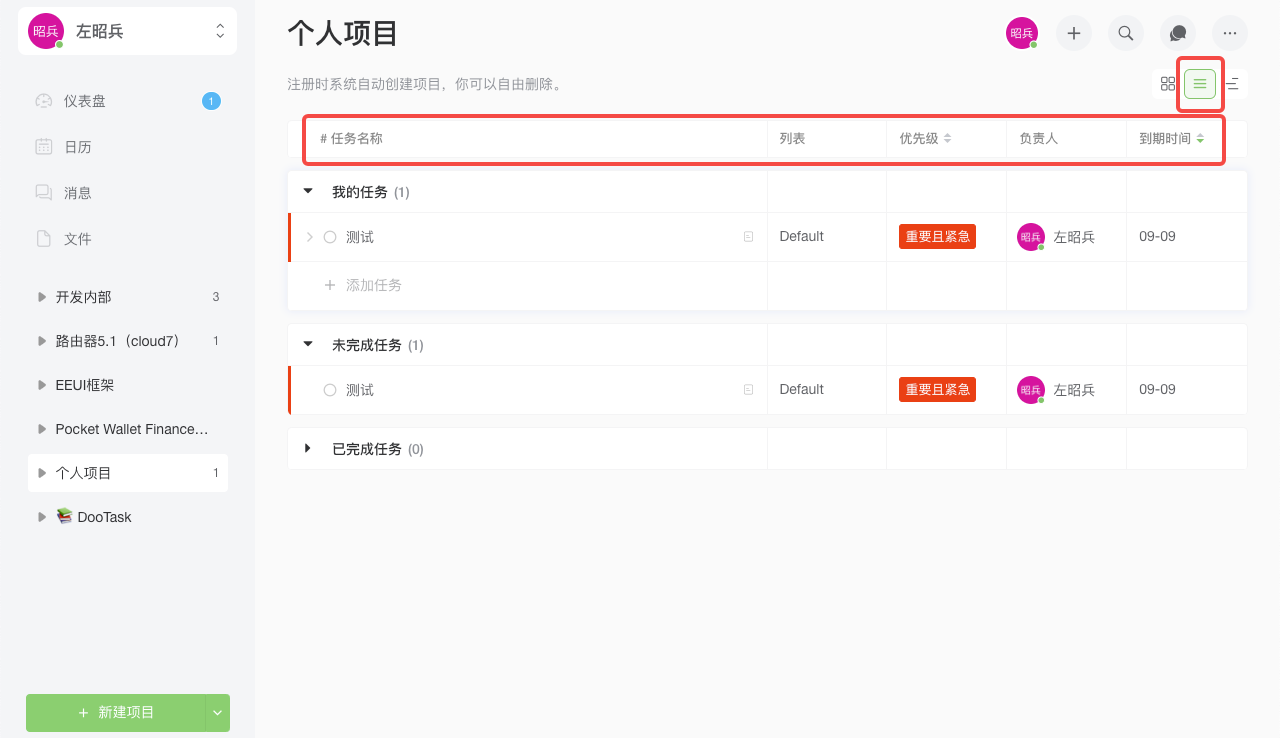
Multi-view Task List
(1) Open DooTask page and click the corresponding project name button on the left side to display the list of all tasks belonging to the project;
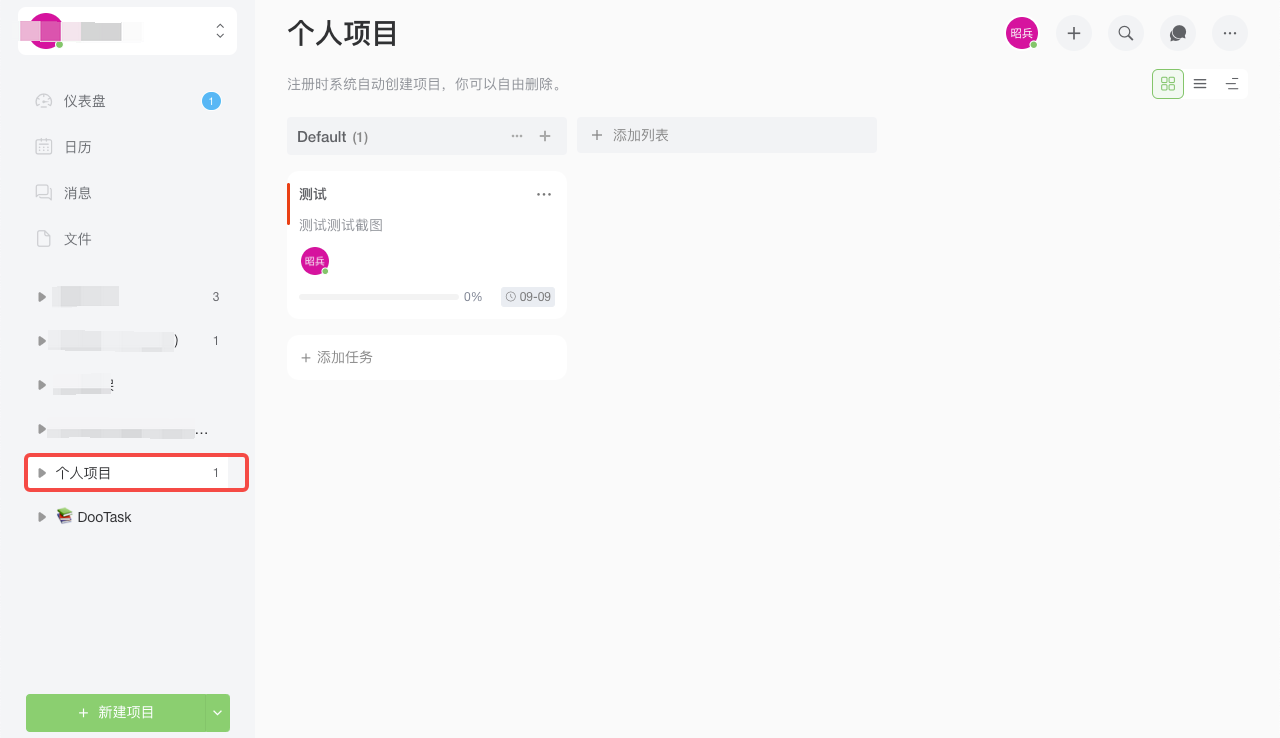
(2) Click the corresponding [Switch View] icon in the upper left corner to view the task classification/task priority/responsible person/due time information of the corresponding task.
-
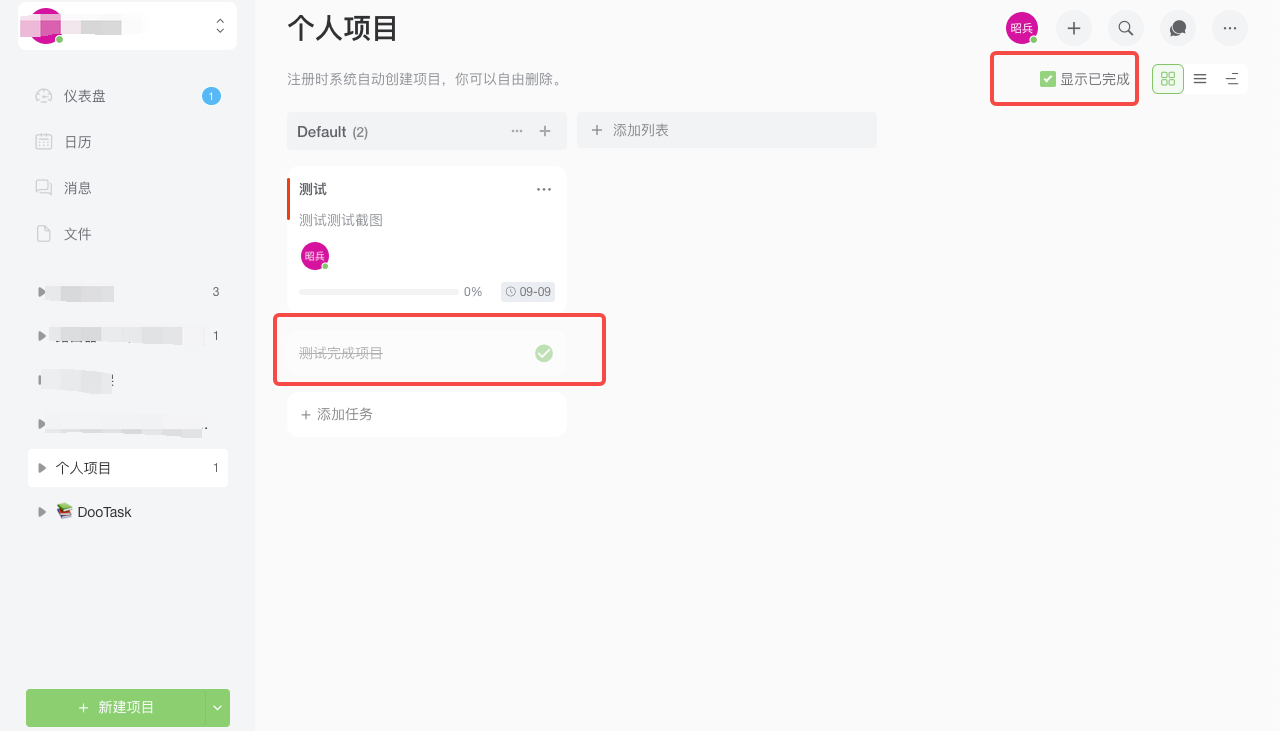
Completed Tasks Display
(1) Under normal circumstances, "Completed Tasks" will be automatically hidden in the task list and will not be displayed;
(2) Check the [Show Completed] icon in the upper-right corner of the project task list to view the "Completed Tasks".
-
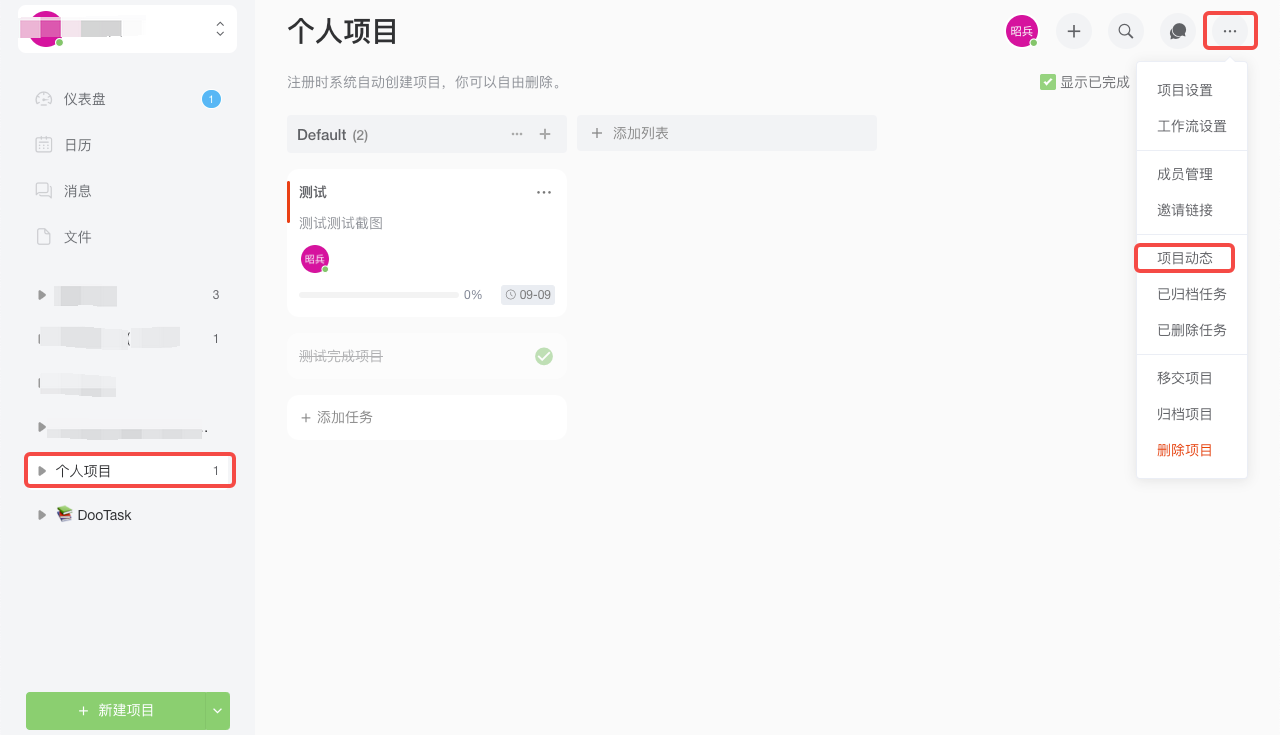
Project Dynamic Display
(1) On the corresponding project page, click the [Project Dynamics] icon in the upper-left corner to view the operation history of project members according to the date.

-
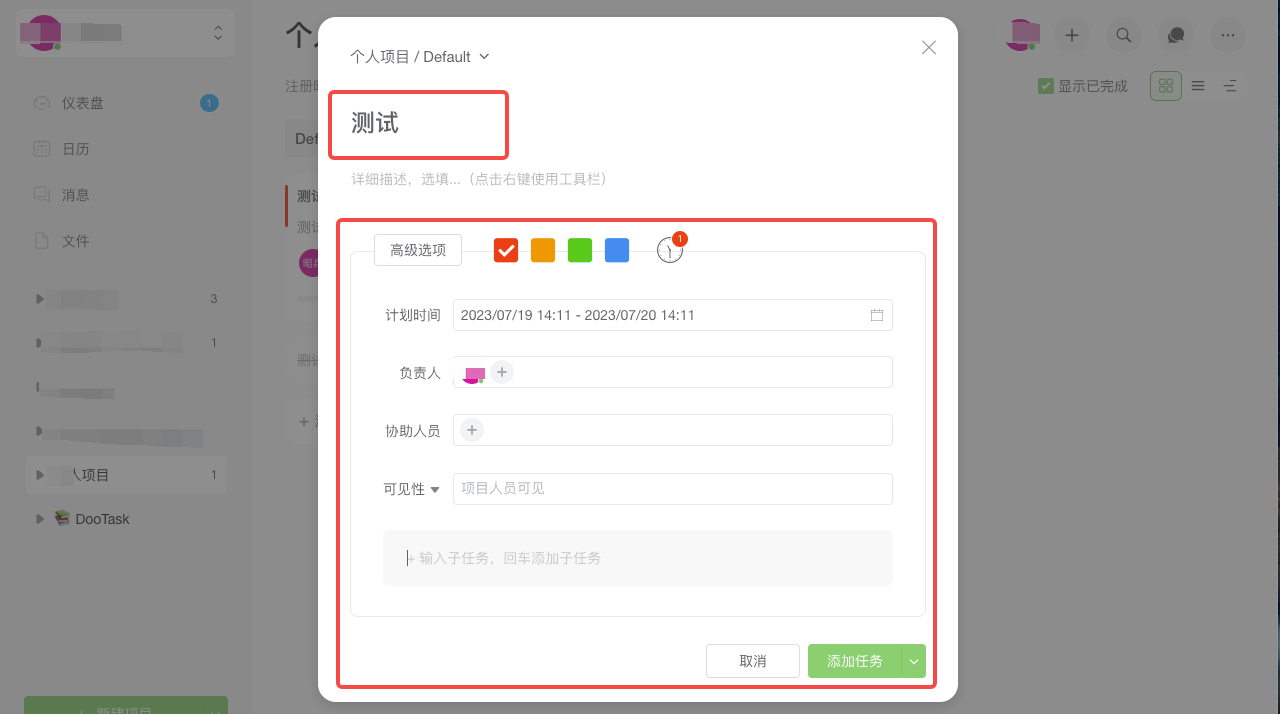
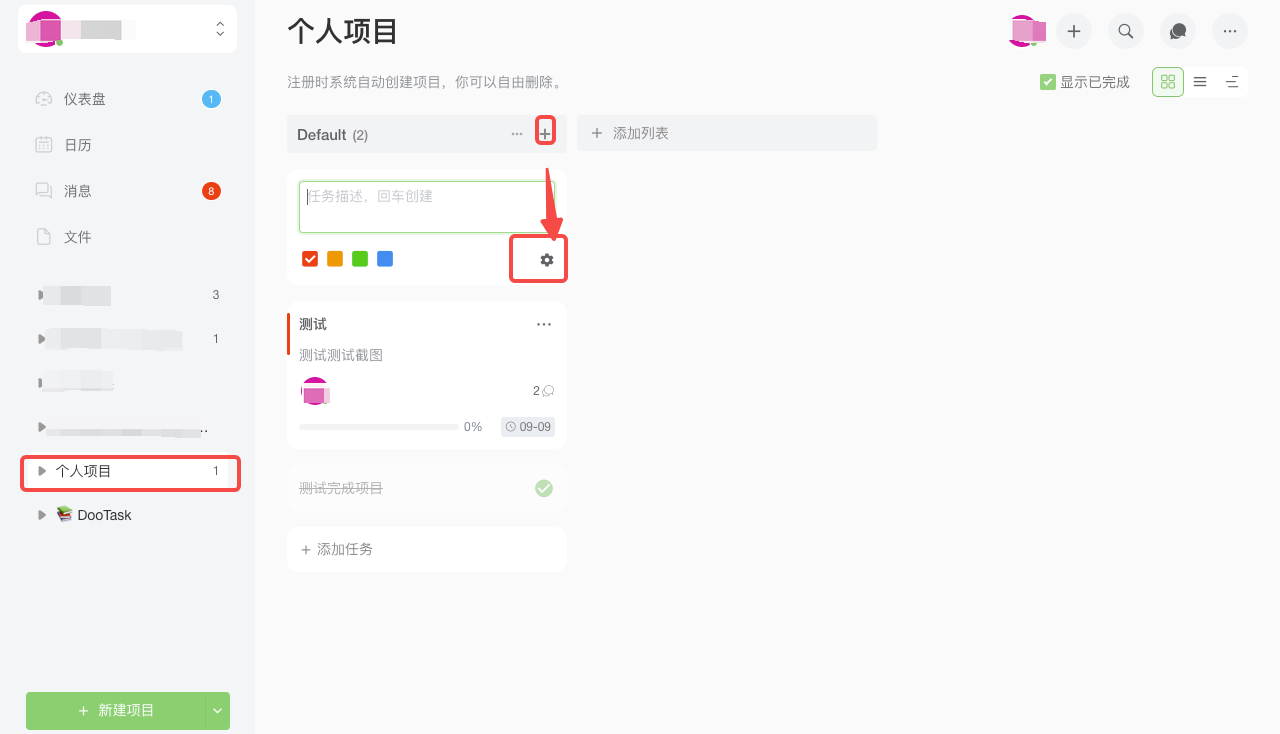
Creating Tasks
(1) Select the project name to enter the task list, and click the [New Task] icon in the upper left corner of the corresponding task list;
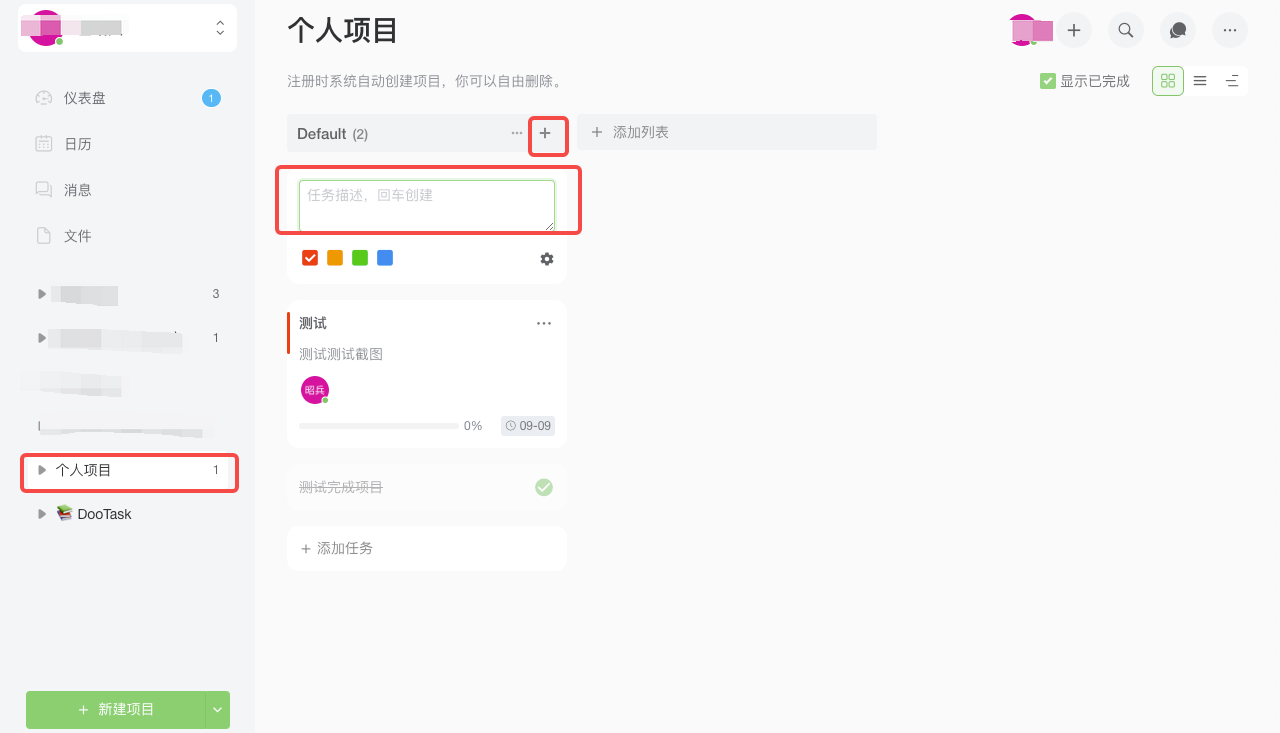
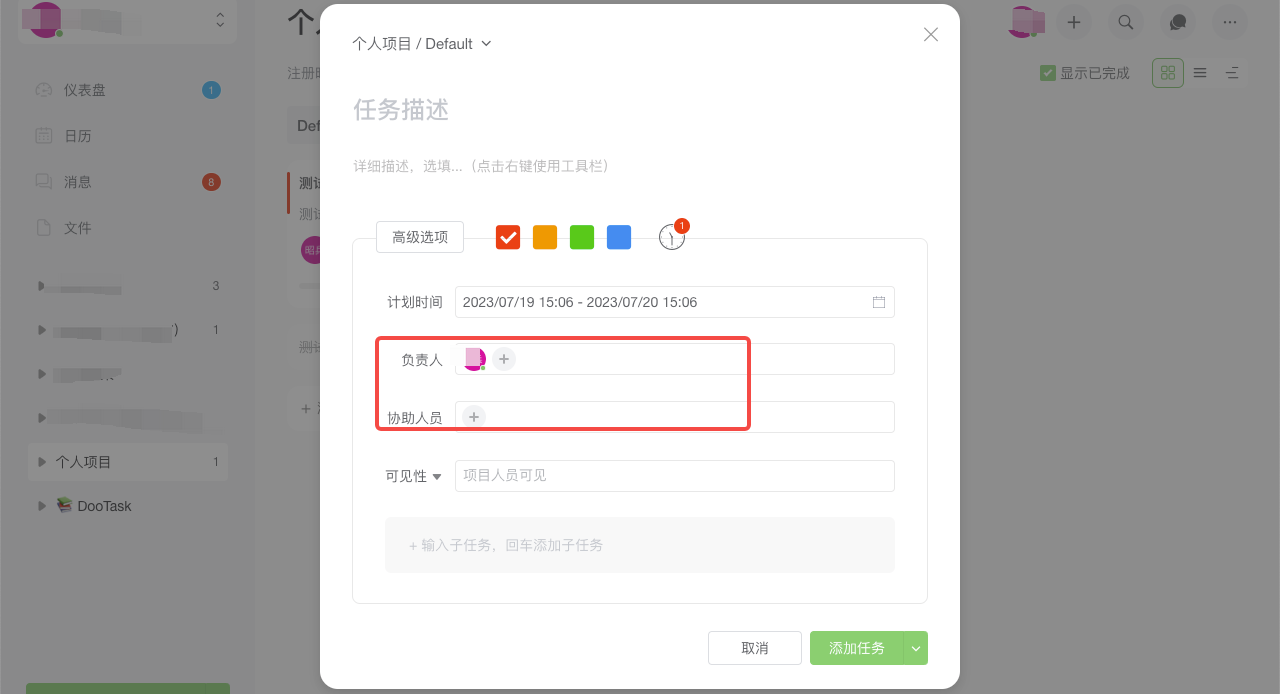
(2) Enter task description/detailed description, select task priority/task time/task leader/visibility and other information in the corresponding input box, and add subtasks as required;
(3) Click [Add Task] in the lower right corner of the Create Task page to complete the creation of a new task.
-
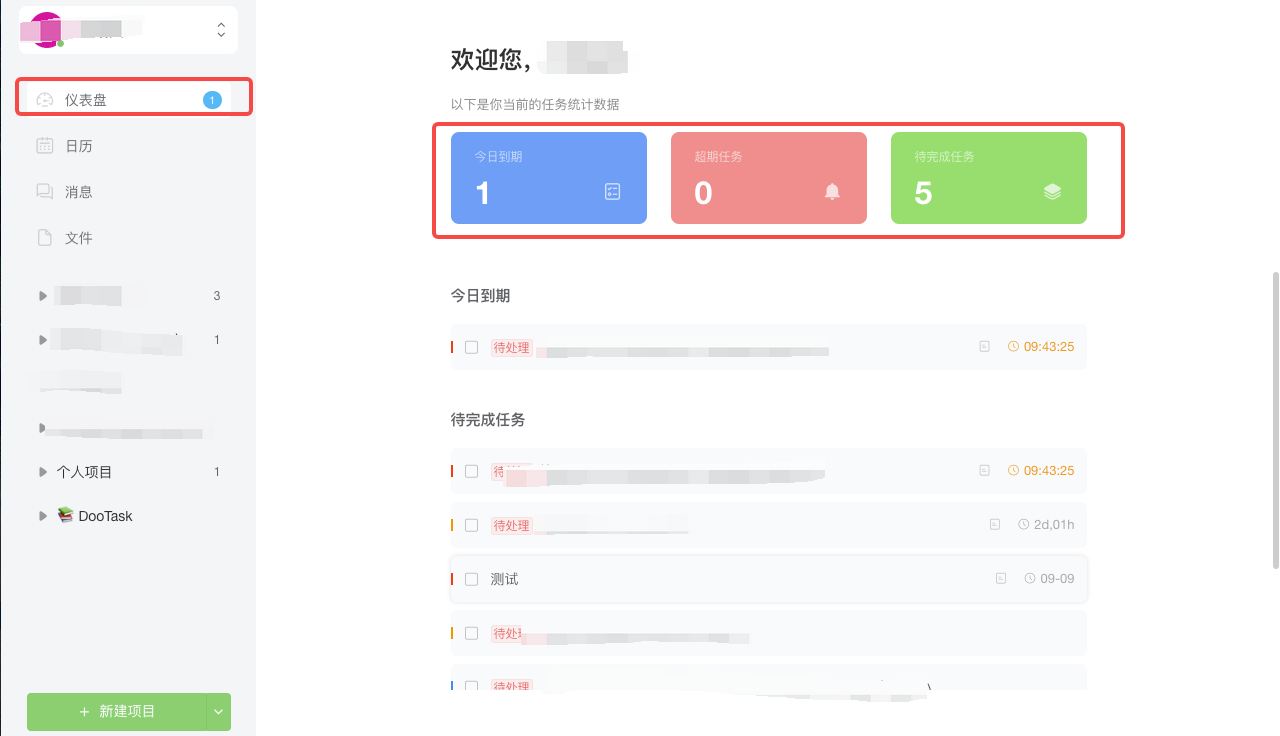
Mission Dashboard
Click [Dashboard] on the left side of the DooTask page to display task statistics (showing tasks due today, overdue tasks, and pending tasks).
-
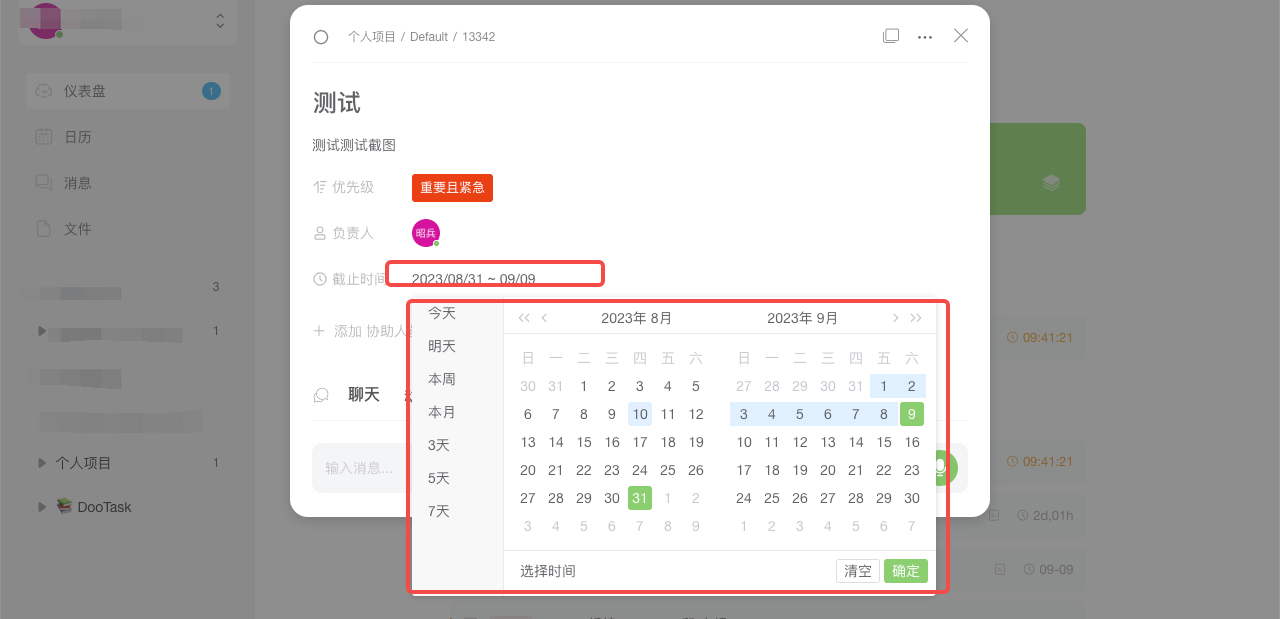
Duration Of The Mission
Select the task that needs to be modified, open the task detail page, click [Deadline] to modify the task time according to the actual situation.
-
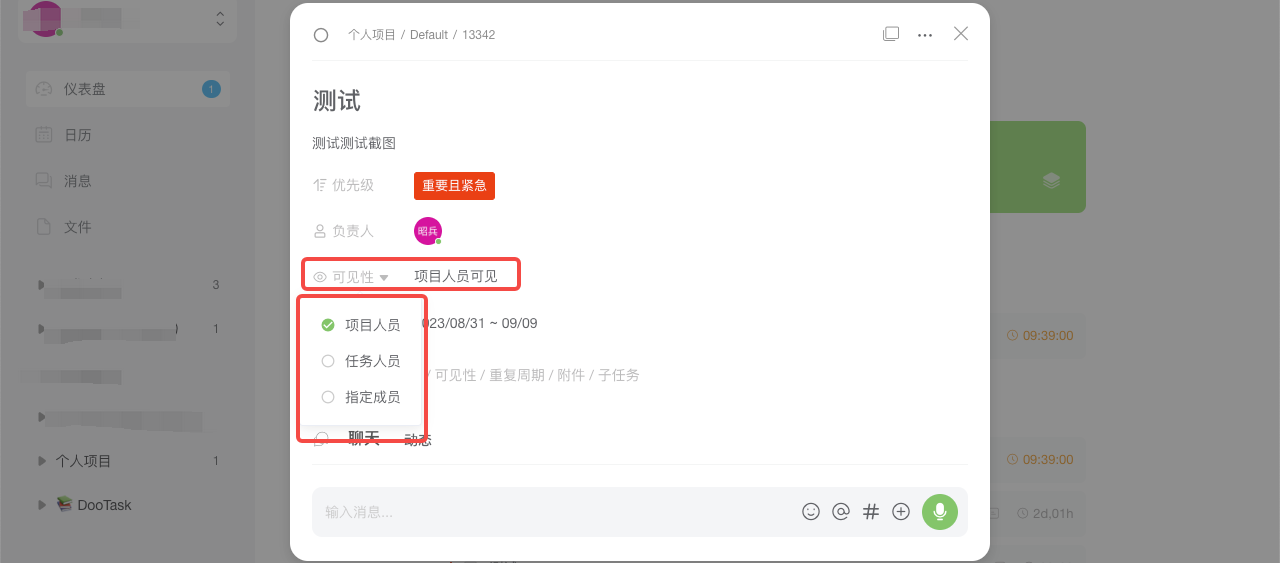
Task visibility
Select the corresponding task, open the task detail page, and click [Visibility] to select project personnel/task personnel/specified members to be visible as needed.
-
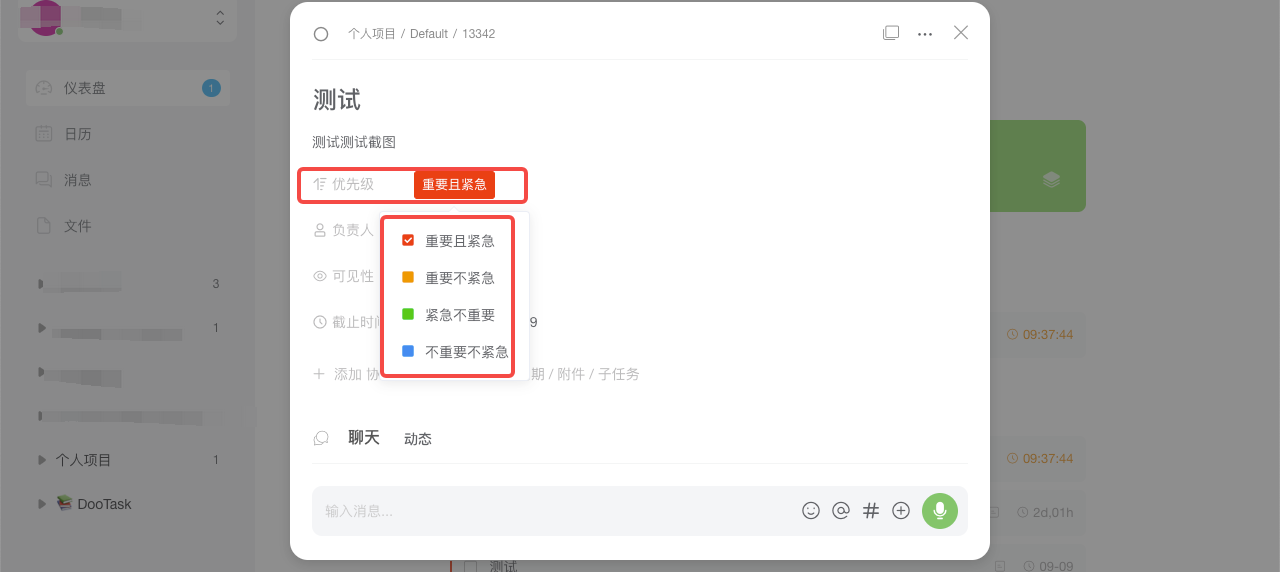
Task Priority
In the task creation window and task details page, you can set the task priority as needed. The system currently supports four major task priorities: important and urgent, important and not urgent, urgent and not important, and not important and not urgent. (You can change the priority according to the task situation)
-
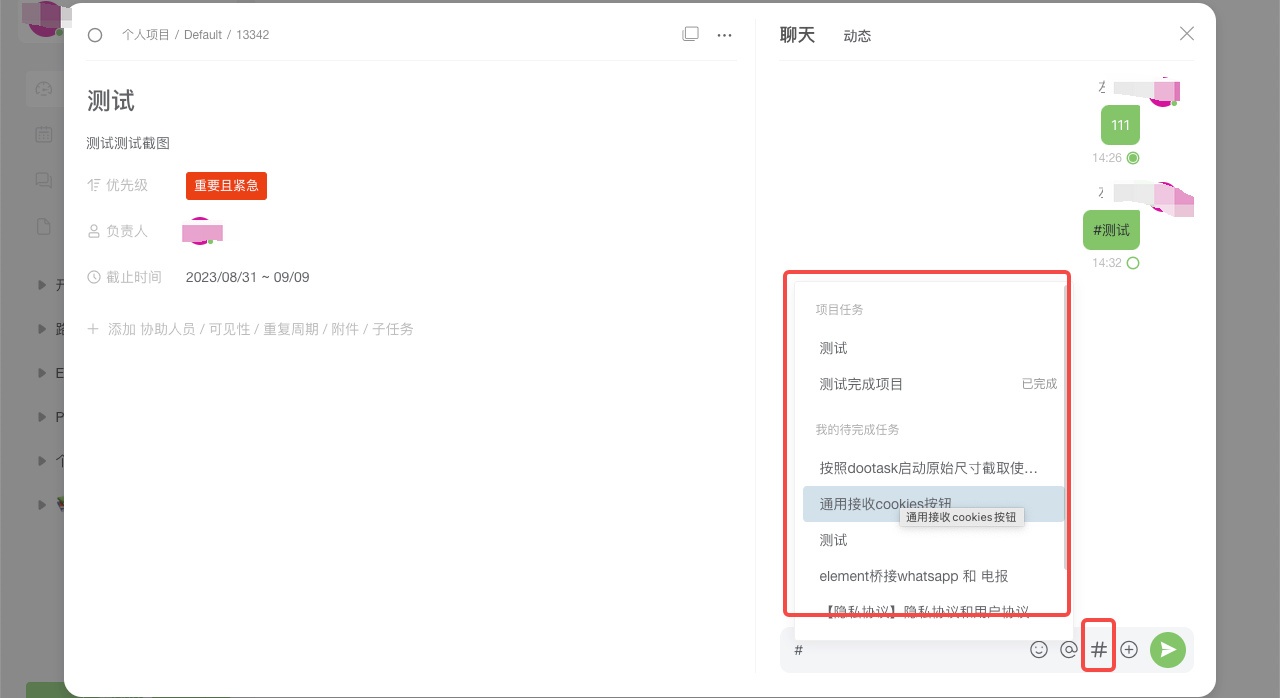
Citing Associated Documents and Tasks
Select the corresponding task, open the task detail page, enter the associated file link/task in the input box of the chat window on the right side of the page, and click the [Send] icon to quote it.
-
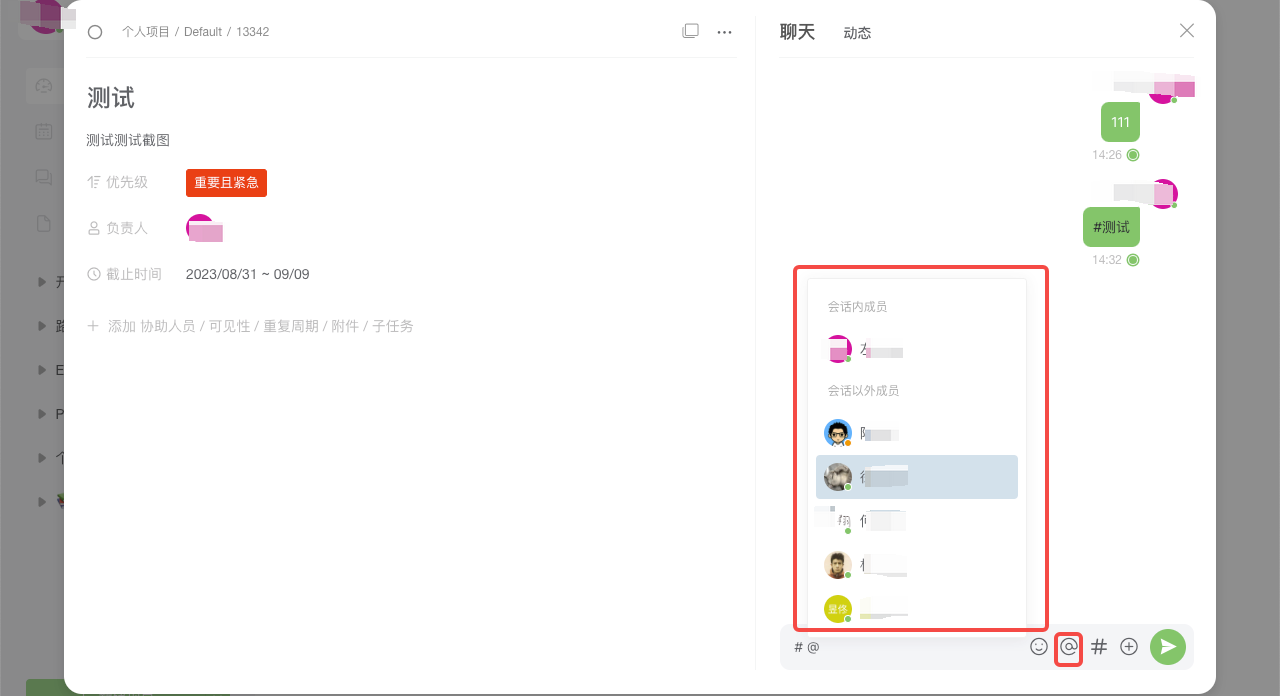
Mission Affiliates
Select the corresponding task, open the task details page, in the chat window on the right side of the page in the input box @ the task associated with the personnel account nickname, click on the [Send] icon, the members of the task instantly enter the group chat.
-
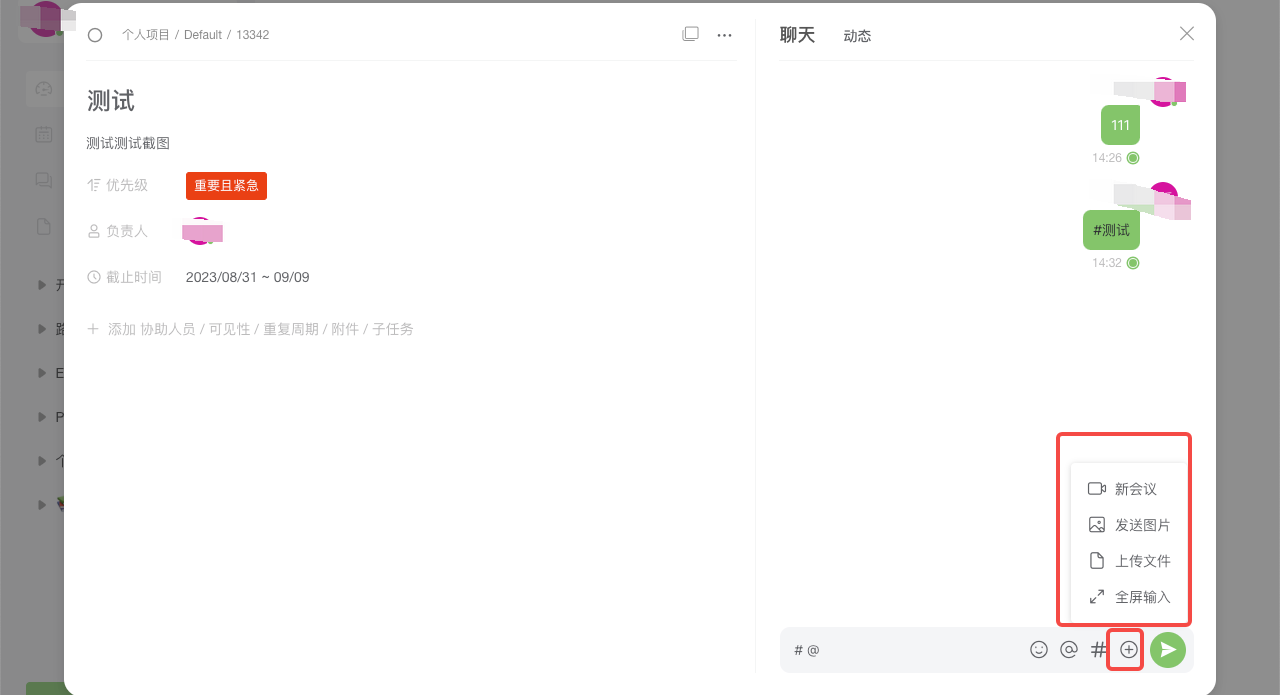
Task Force Meeting
Select the corresponding task, open the task details page, and click the [Expand] icon at the bottom right of the chat window on the right side of the page to launch a group video/voice conference for all members in the task group chat.
Group video/voice conferencing can be initiated for all members within a task group chat.
-
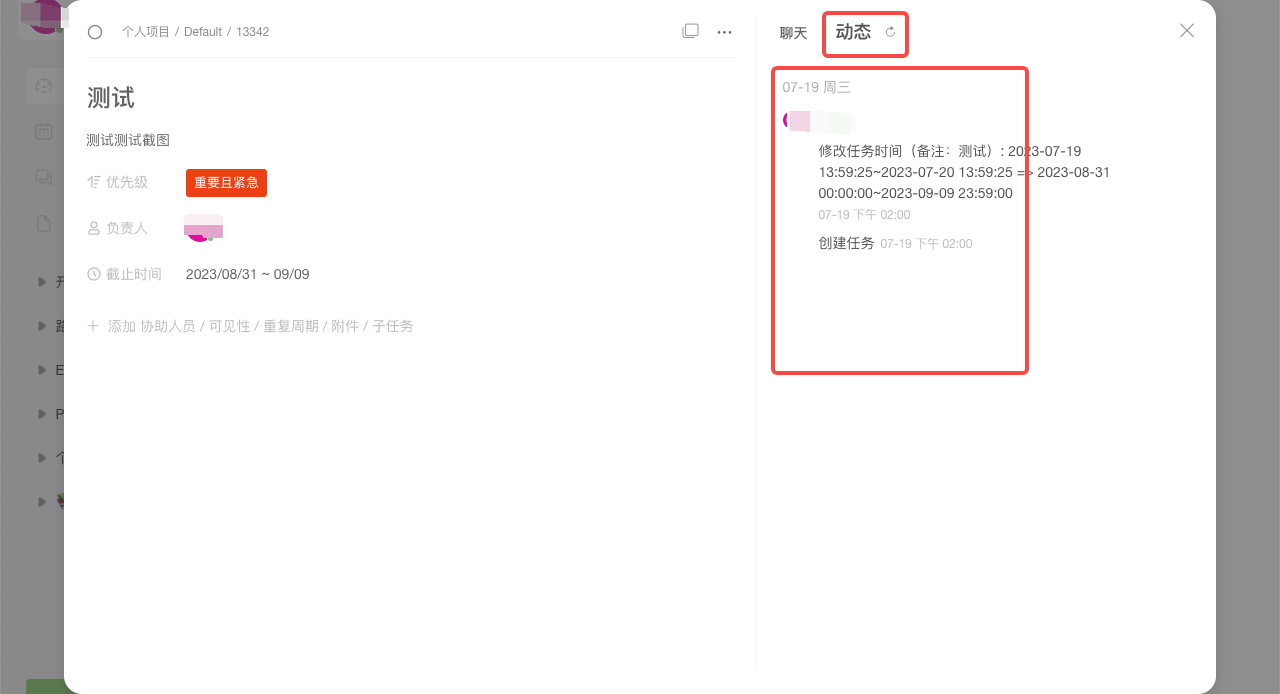
Project Dynamic Display
In the corresponding task detail page, click the [Task Dynamics] icon in the upper right corner to view the operation history of task members according to the date.
-
Corporate Governance
Helping organisations to their corporate goals, connecting objectives, key results and individual work, and working together to drive strategy to fruition and goals to be achieved;
Through collaborative authoring, the progress, completion status and schedule of all enterprise work are shared to facilitate the flow of information, so that all staff can access key project information, follow up in a timely manner and promote cross-departmental collaboration.
-
Product Management
Customise the workflow of the product development process, assign tasks to different roles at different stages to promote the product development process; archive the history of each completed project and task, so that it is easy to call or discuss at any time, forming a closed loop of knowledge precipitation to reuse.
-
Personnel Administration
Obtain multi-dimensional corporate data through data visualisation statistical reports to gain a comprehensive understanding of employee performance and make performance evaluation more objective and fair; use announcements to release notices, arrange company activities, deliver corporate decisions, facilitate the shaping of corporate culture and make employees more engaged.
-
Working Report
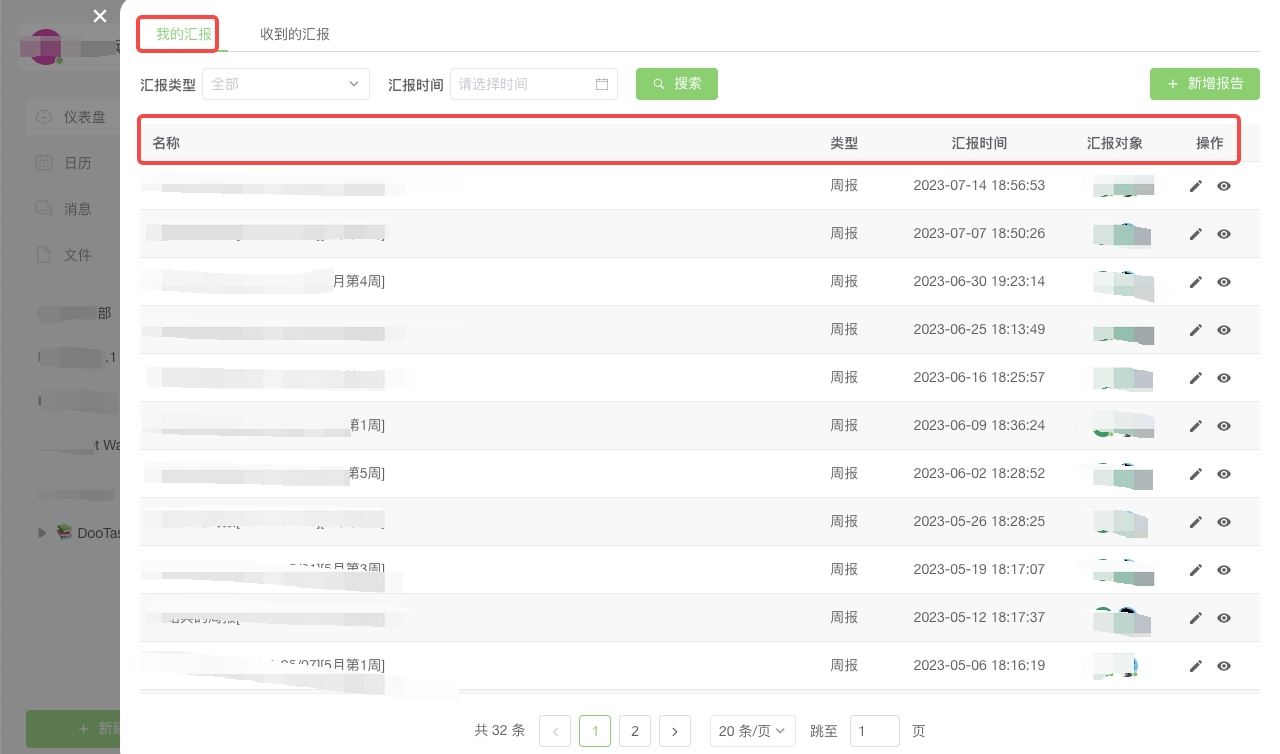
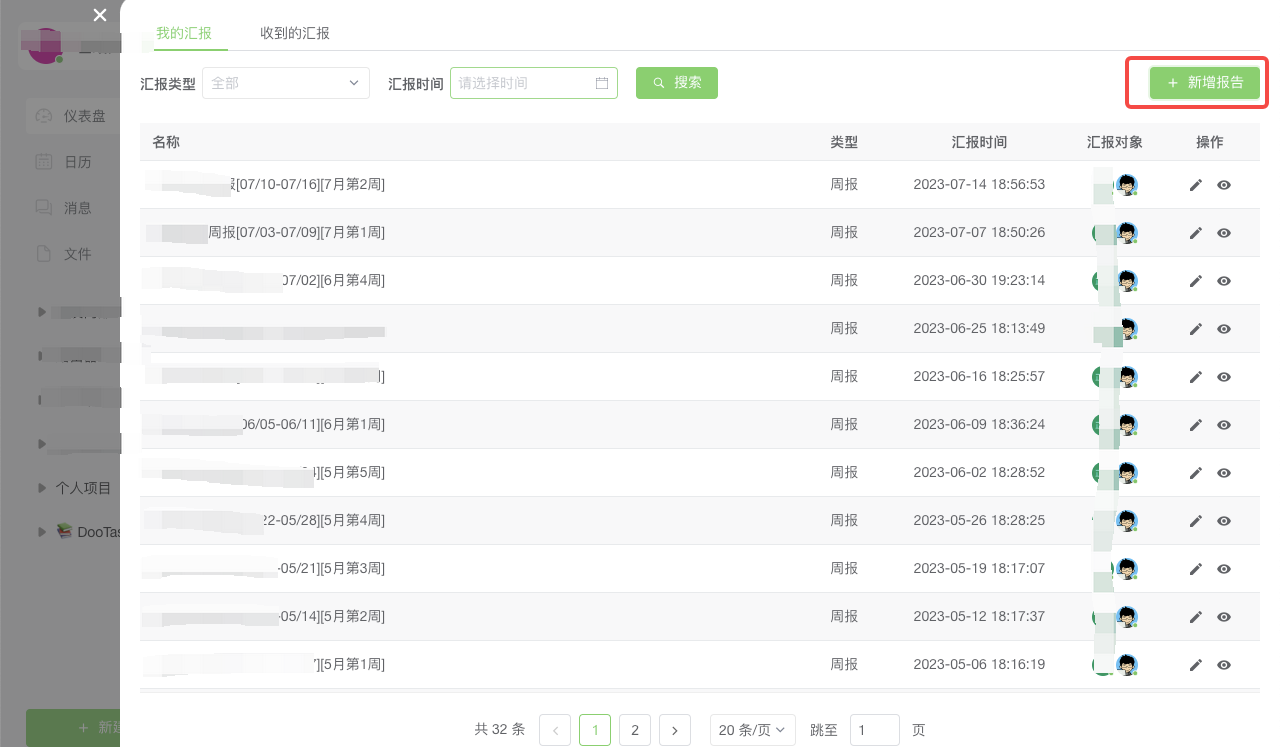
1 My debriefing:
Report Search
Click on the user's avatar in the upper-left corner → click on [Work Reports] → click on [My Reports], select the type of report/reporting time that needs to be queried on the upper-left side of the page, and click on [Search] to instantly display the relevant report data.

Reporting Record Display
Click the user's avatar in the upper-left corner → click [Work Reports] → click [My Reports], and you can view the name/type/reporting time/reporting object/operation and other information of the corresponding report on the Work Reports page.
Additional Reports
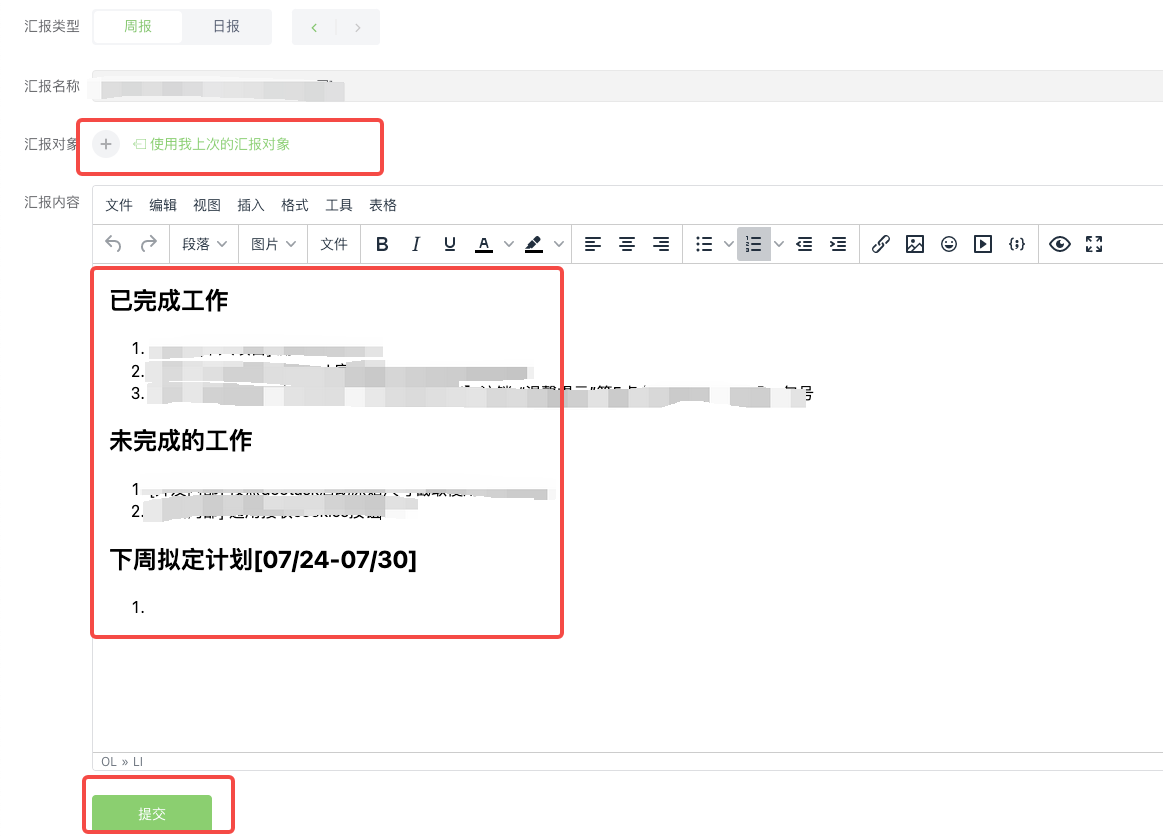
(1) Click on the user's avatar in the upper-left corner → Click on [Work Reports] → Click on [Add Report];
(2) On the New Report page, select the report type (select Weekly/Daily)/reporting object (you can directly use the object of the last report), enter the corresponding report content, and click [Submit] to complete the report.
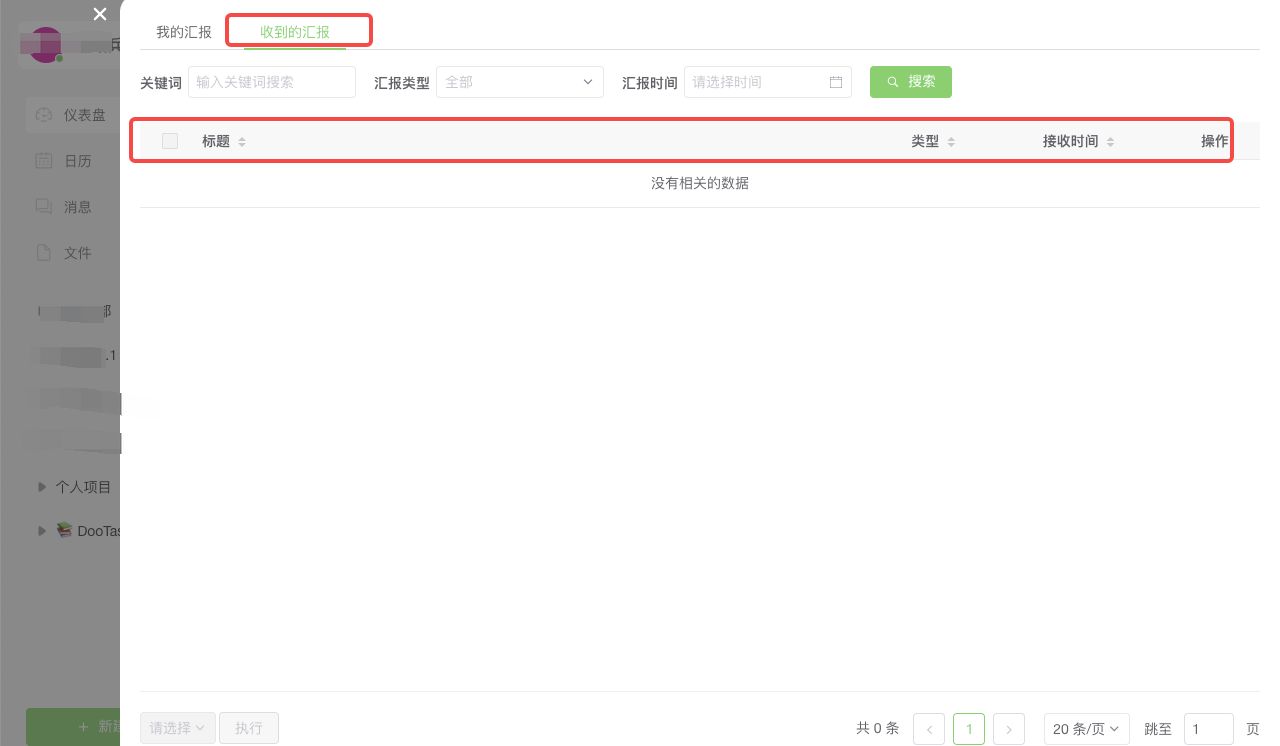
2 Report received:
Report Search
Click on the user's avatar in the upper-left corner → click on [Work Reports] → click on [Received Reports], select the keywords/reporting type/reporting time that you need to query on the upper-left side of the page, and click on [Search] to instantly display the relevant report data.
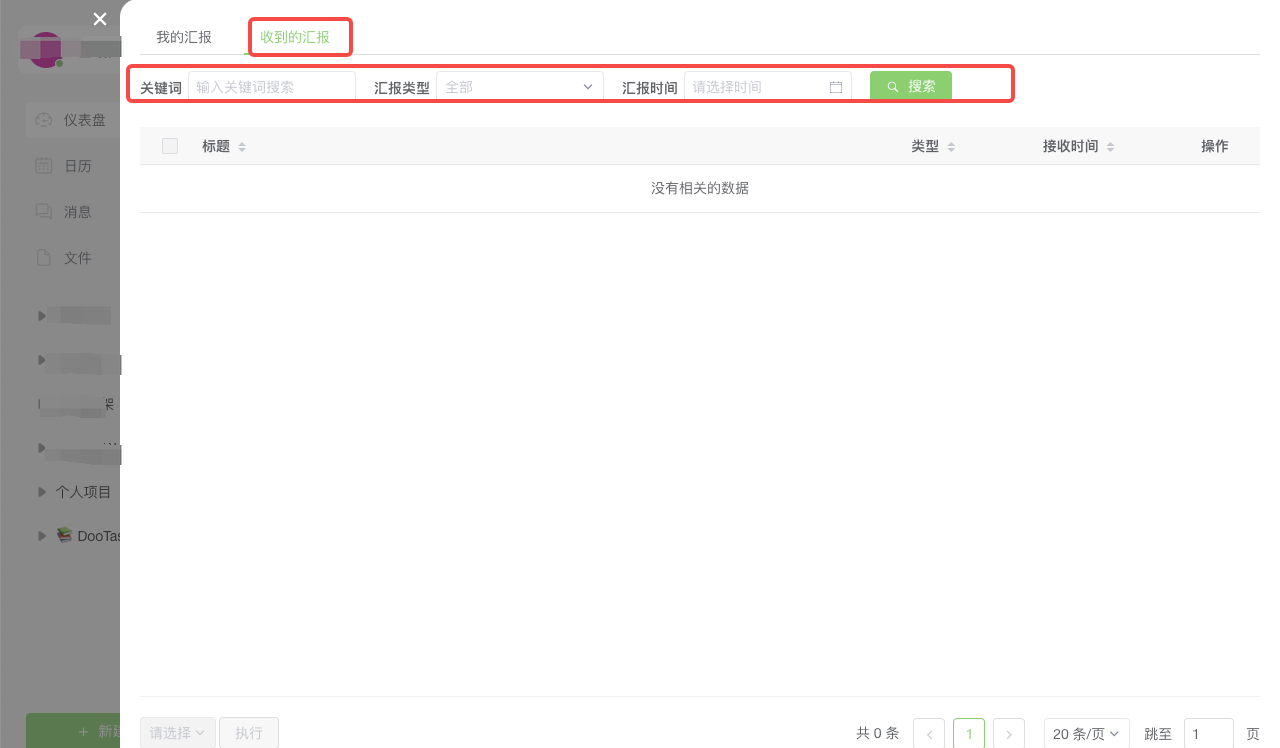
Reporting Record Display
Click the user's avatar in the upper-left corner → click [Work Reports] → click [Received Reports], and you can view the title/type/receipt time//operation of the corresponding report on the Work Reports page.
-
Data Dxport
Click the user's avatar in the upper-left corner → click [Team Management], and select [Export Task Statistics] / [Export Overdue Tasks] / [Export Approval Data] / [Export Check-In Data] according to your needs to export the associated data records.

-
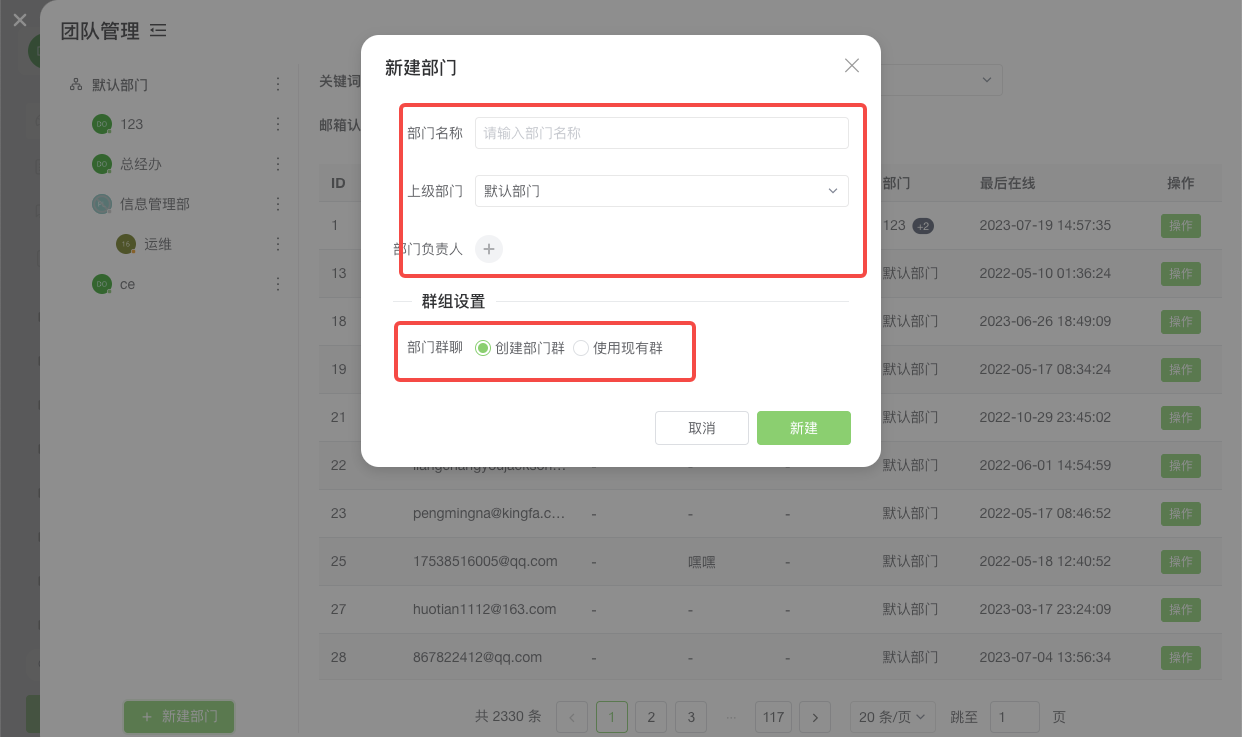
New Sectors
(1) Click on the user's avatar in the upper-left corner → Click on the "Team Management" option in the [Team Management] list, and then click on [New Department] in the lower-left corner of the page;
(2) Enter the name of the department in the New Department pop-up window that appears → Select the parent department → Add the department head → Choose to create a departmental group chat or use an existing group chat;
(3) Click [New] to complete the creation of a new department.
-
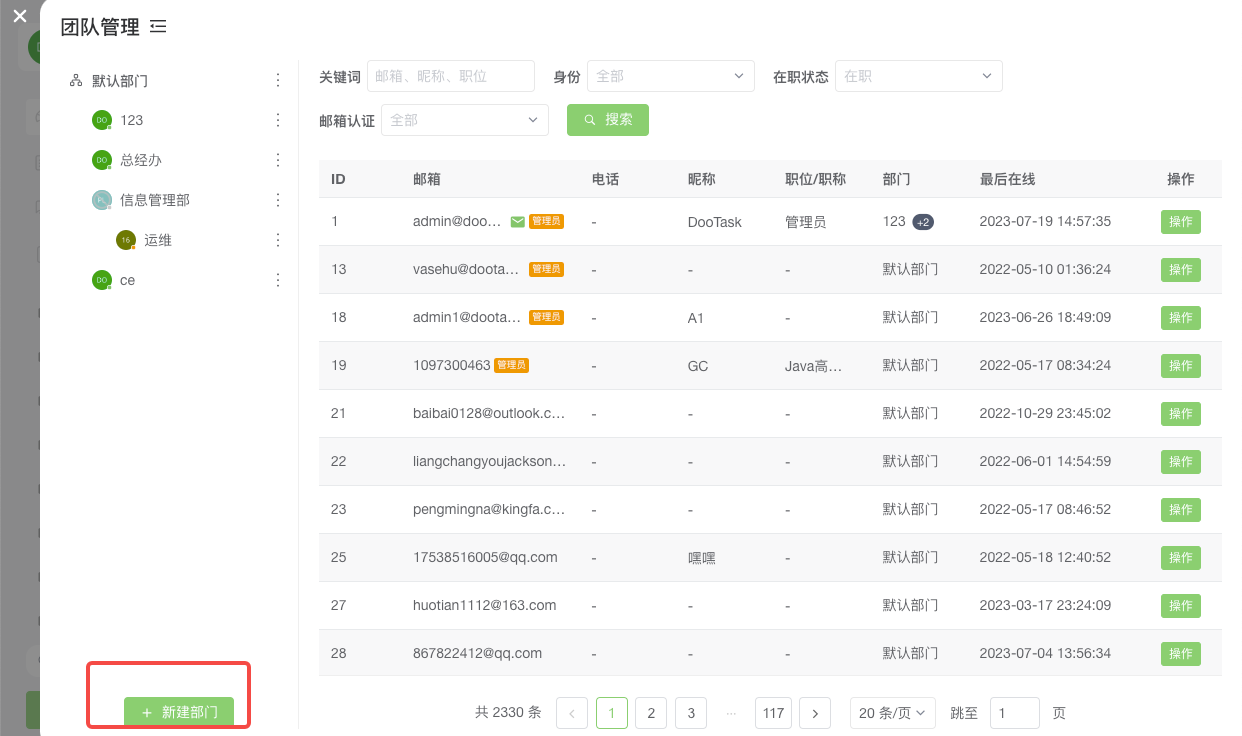
Search For Members
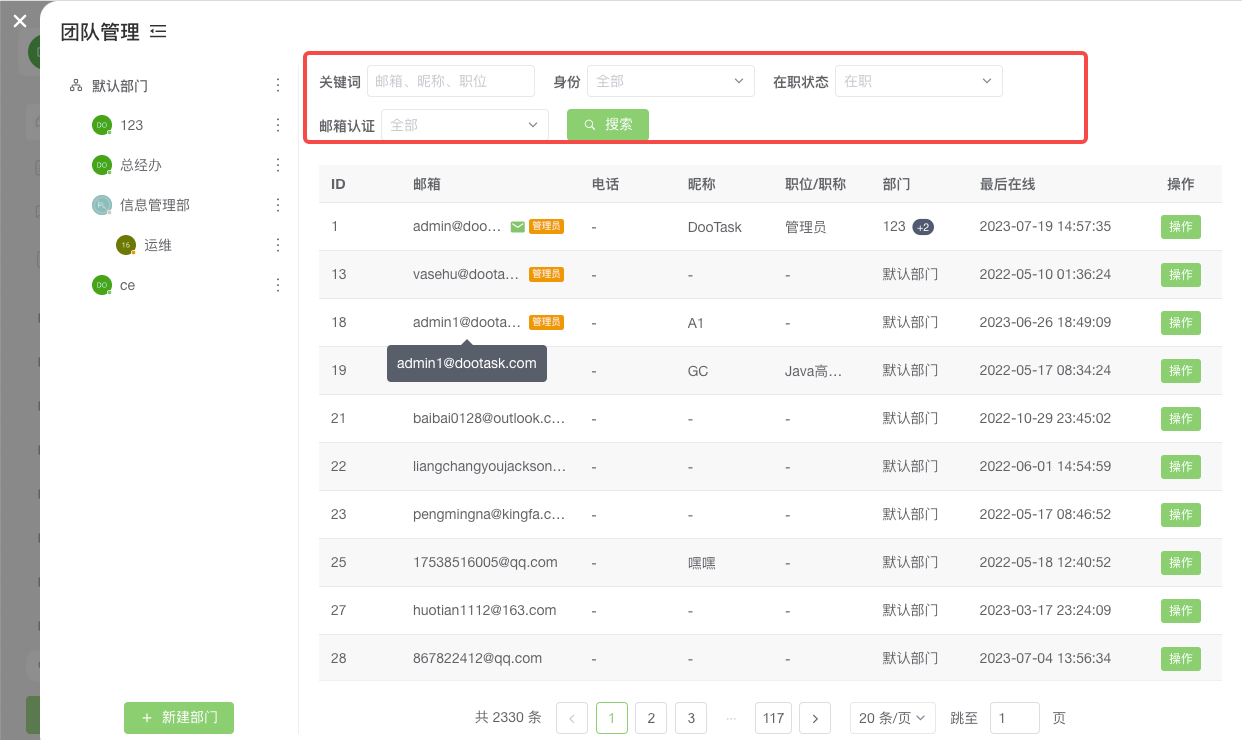
Click on the user's avatar in the upper-left corner → Click on the "Team Management" option in the [Team Management] list, select the keywords/identity/on-the-job status/email authentication that you need to query at the top of the page, and then click on [Search] to display the relevant personnel information.
-
Team Member Operation
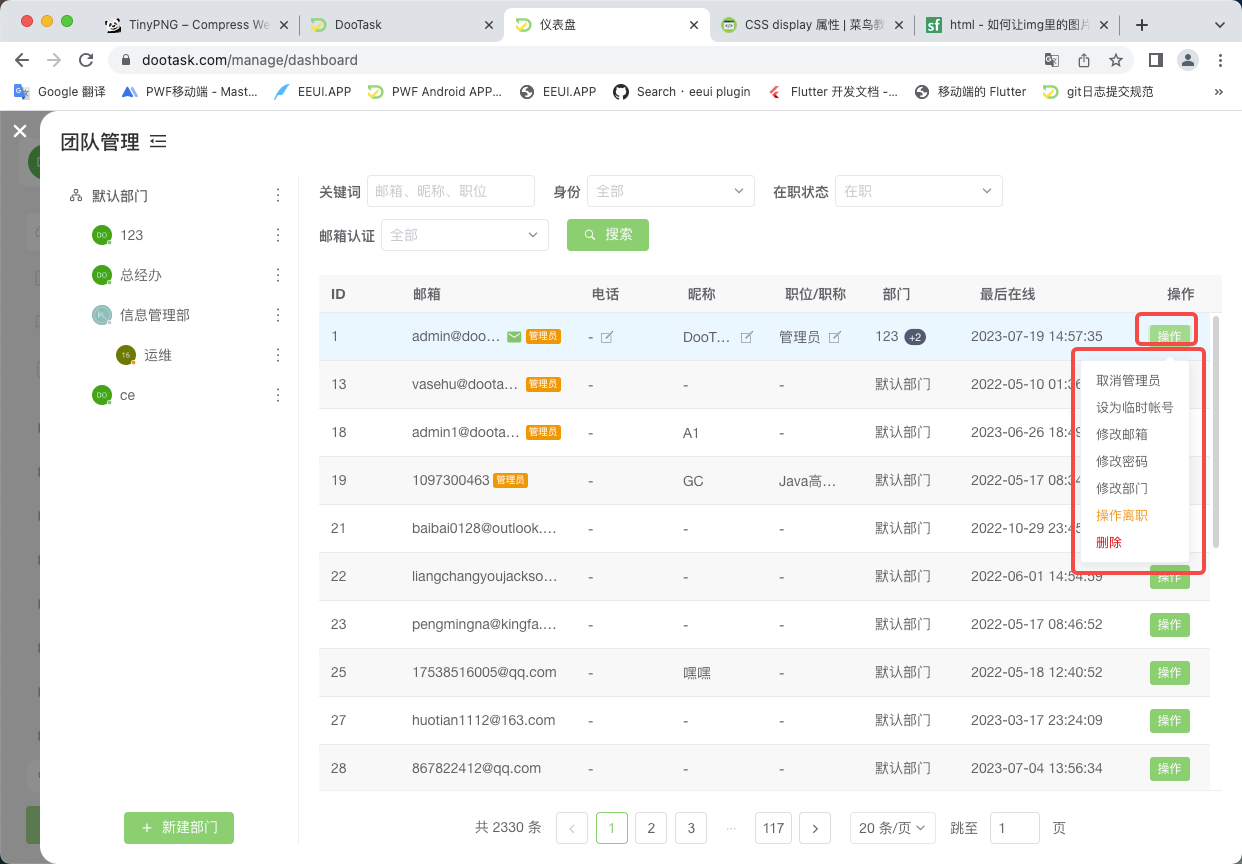
Click on the user's avatar in the upper-left corner → Click on the "Team Management" option in the [Team Management] list, click on the corresponding personnel information [Operation] button, you can choose to carry out the member: set up as an administrator / set up as a temporary account / change the mailbox / change the password / modify the department / operation of the operation of the departure / deletion of the operation.
-
Project Members
(1) Select the corresponding project and click [Member Management] on the upper right to add/delete project members;
(2) Click [Cancel] to cancel the member management settings and [Save] to save the member modification management operation.

-
Mandate Holder
Select the corresponding project, click the [New Task] icon in the upper right corner of the task list → click [Advanced Options] to add/delete the relevant task leader or assistants.
-
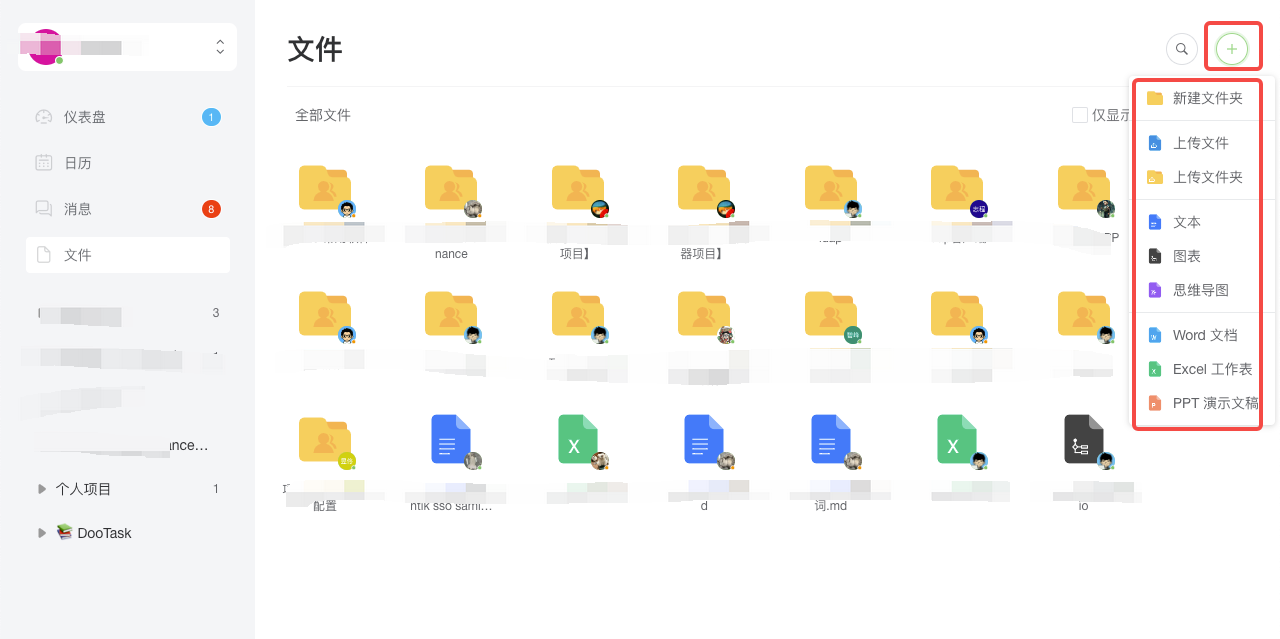
File Type
(1) Click [File] on the left side of the DooTask page to display and view project-related files.
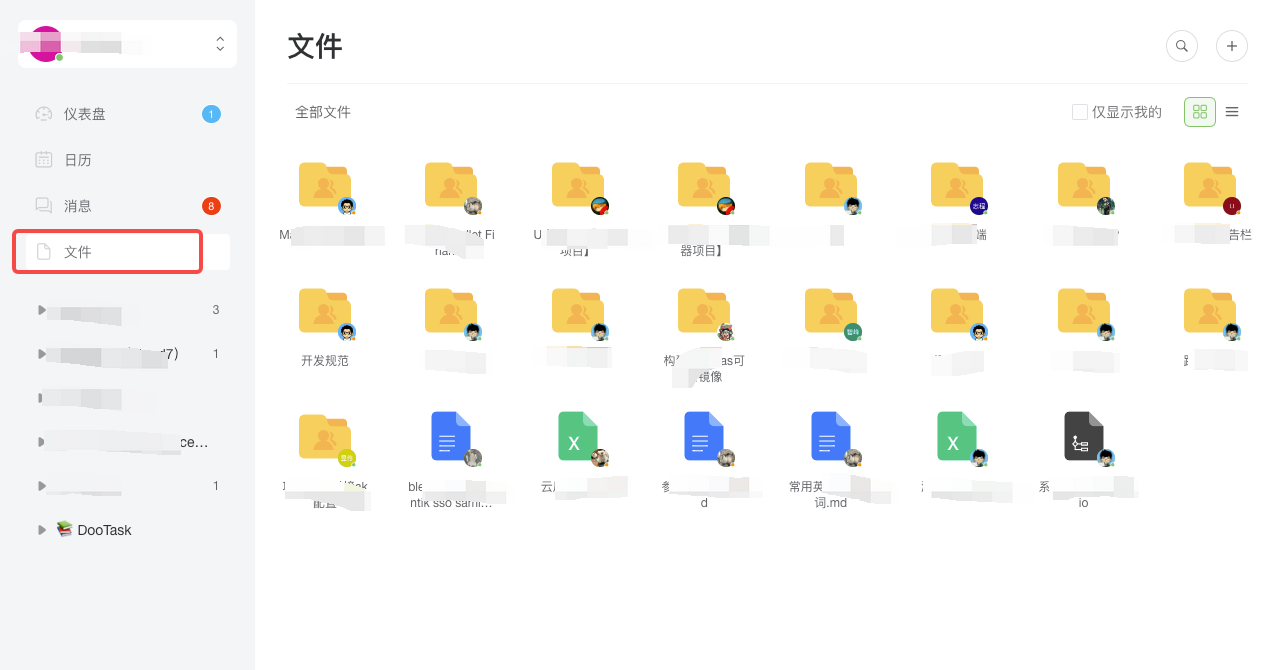
(2) Click the [New File] icon button in the upper right corner of the page to create a new folder/upload files/upload folders, the current system supports text, icons, mind maps, Word documents, Excel worksheets, PPT presentations a variety of file types.
-
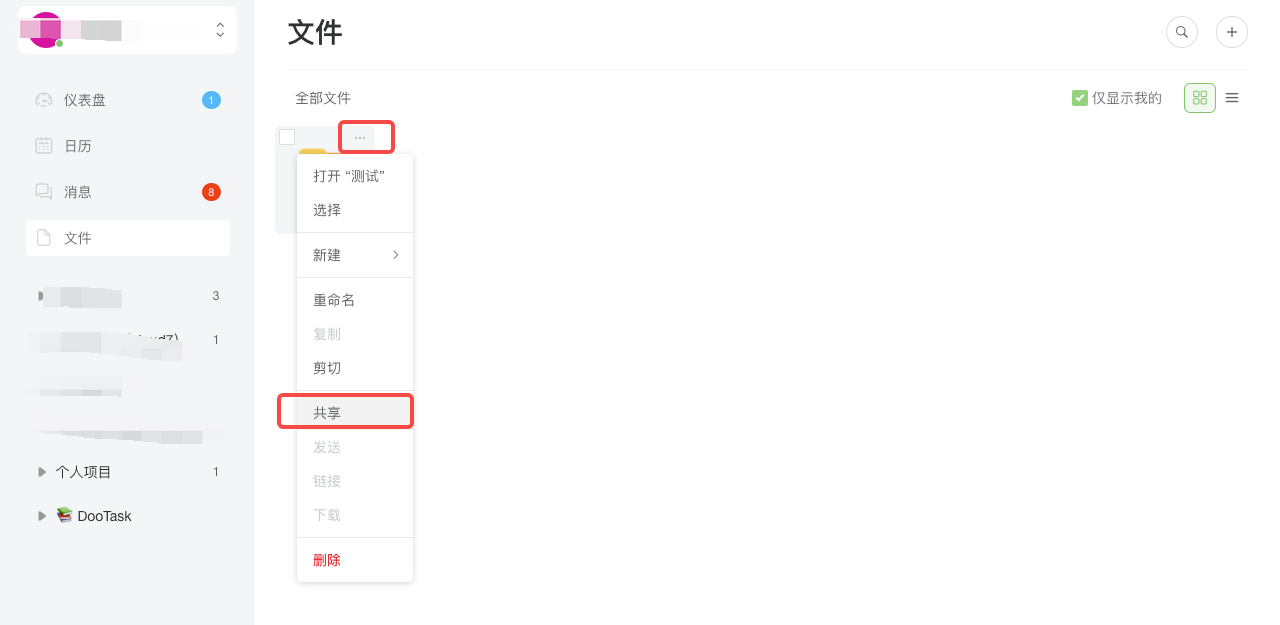
File Sharing
Click [File] on the left side of DooTask page, select the corresponding folder/file and click the icon in the upper right corner, then click [Share] to share the folder/file to relevant project members.
-
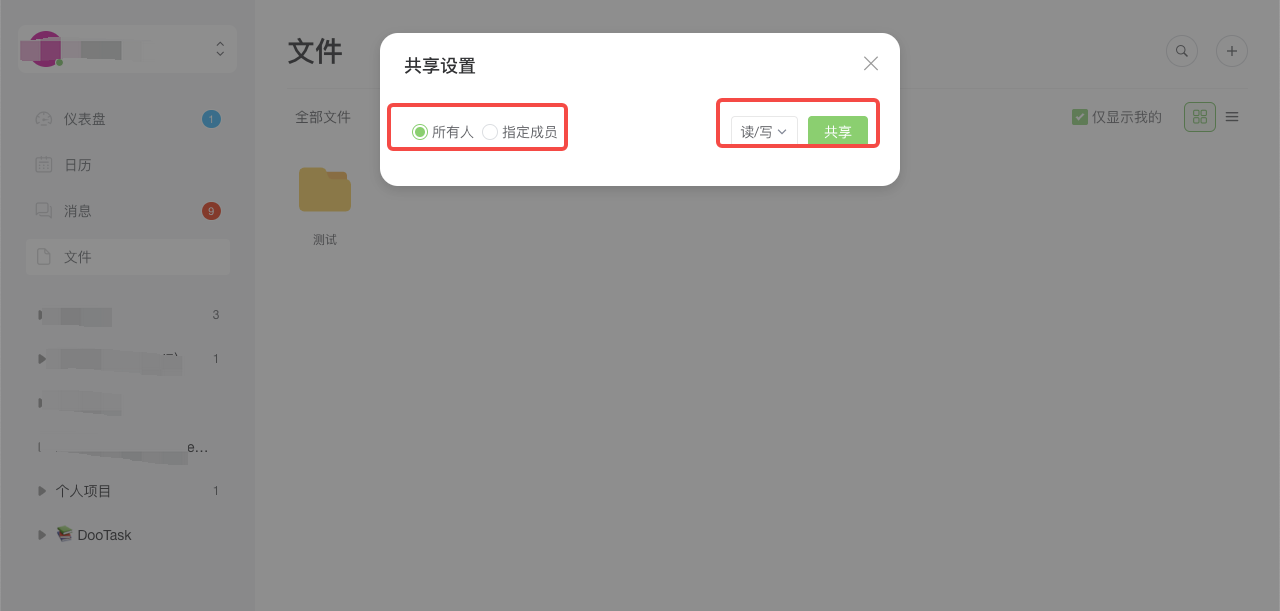
Access Authority
(1) Click [File] on the left side of DooTask page, select the corresponding folder/file and then click the icon on the upper right corner, click [Share] to open the sharing settings;
(2) According to the need to select all people/specified members visible, shared file read/write/read-only, click [Share] to complete the operation.
-
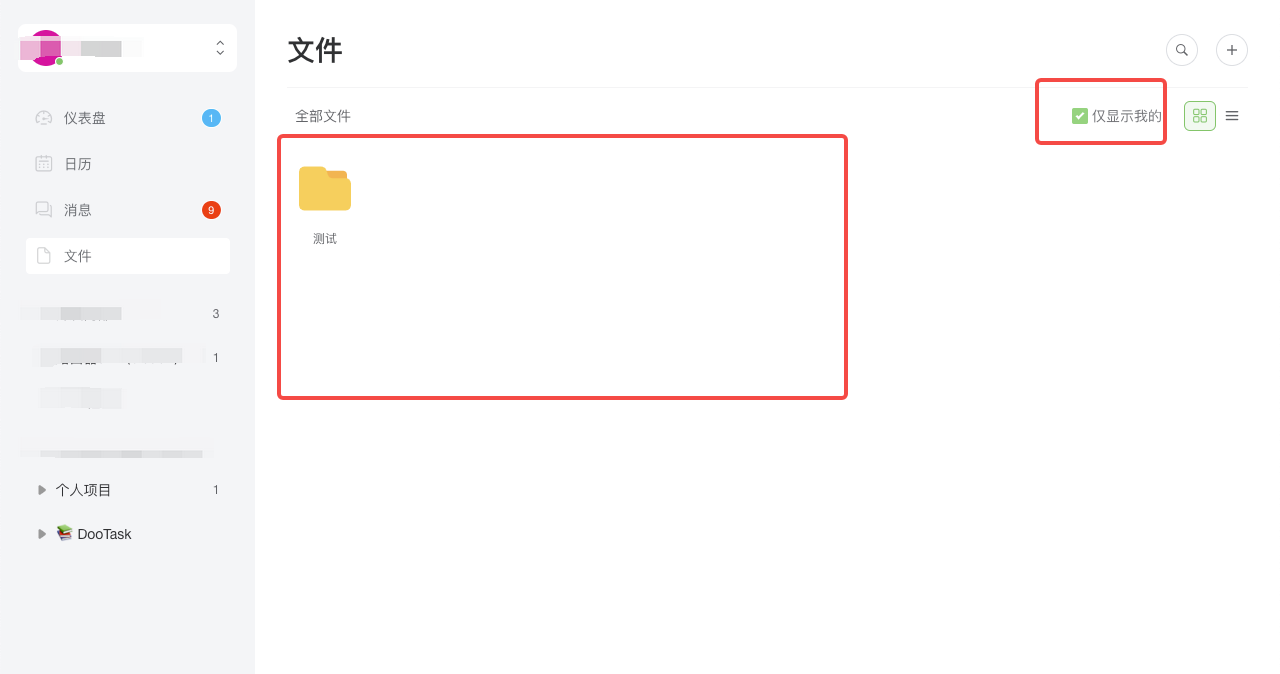
Document Display
Click [Files] on the left side of the DooTask page and tick the [Show My Only] icon at the top right corner of the page to view your personal files.